Agencies
Contents
REQUIRED FIELDS FOR AGENCY SETUP
Agency Status (created in Setup - System Element Setup)
County (created in Setup - System Element Setup)
Statistic Group (created under Agency - Statistic Setup)
Service Fee (created in Setup -System Element Setup)
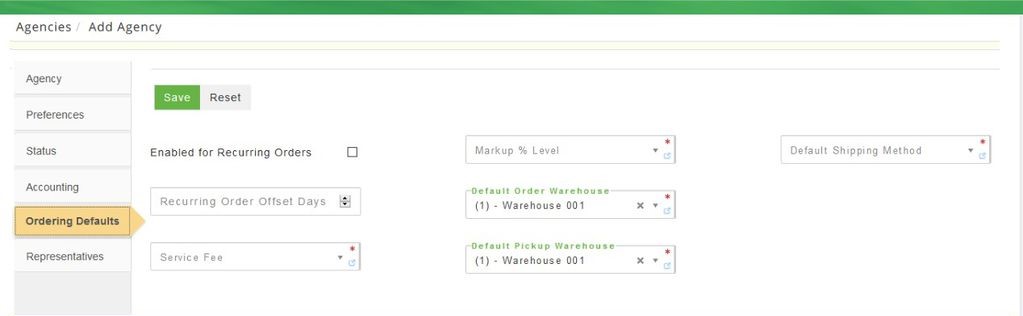
Markup % Level (created in System - System Element Setup)
Default Order Warehouse (created in Inventory - Warehouse)
Default Pickup Warehouse (created in Inventory - Warehouse)
Agency Type (created in the Setup- System Element Setup) IF you are a FA affiliate and will be running a QPR.
** While they are not required, Feeding America food banks will want to fill in the Main Contact and Main Address so that they automatically carry over to new orders! **
QUICK START:
Process Description:
When creating an agency there are several things to consider: Is the agency eligible for any grants? (grant allocation) Does the agency need a credit limit? (no limit is the default) Does the agency need a limit for types/quantities of products it can order? (Limits) Is the agency subject to any miscellaneous charges such as membership fees? Is the agency eligible to pick up directly from a donor/vendor? What product categories can the agency order?(hamburger-product category) Can the agency pickup directly from a donor? Does the agency participate in Food Rescue? You can have multiple checks for an agency; they might do pickups, they might use food rescue, they might only get free food. ((preferences tab) The setups for an agency are mainly found using the Hamburger. Proper setup ensures that the agency billing/statements/and orders work properly. Not all fields are required but the more information added about the agency the easier it is for the food bank to track the agency and include the agency in certain reports. When adding agency contacts there are 2 tabs to choose from: the General tab to add agency contacts and the Web Window which is used to add a contact for PWW online ordering.
Before an agency can place any orders, an address and contact should be created and product categories MUST be assigned. It is important to ensure all product categories and any limits (both are found using the Hamburger) are correctly assigned to an agency so that when the agency places an order it sees only what it is eligible for such as yellow receipt, blue receipts, snap, etc. If the agency is created without assigned categories and tries to place an order no products will be found. (because no allowed product categories were added).
PIN
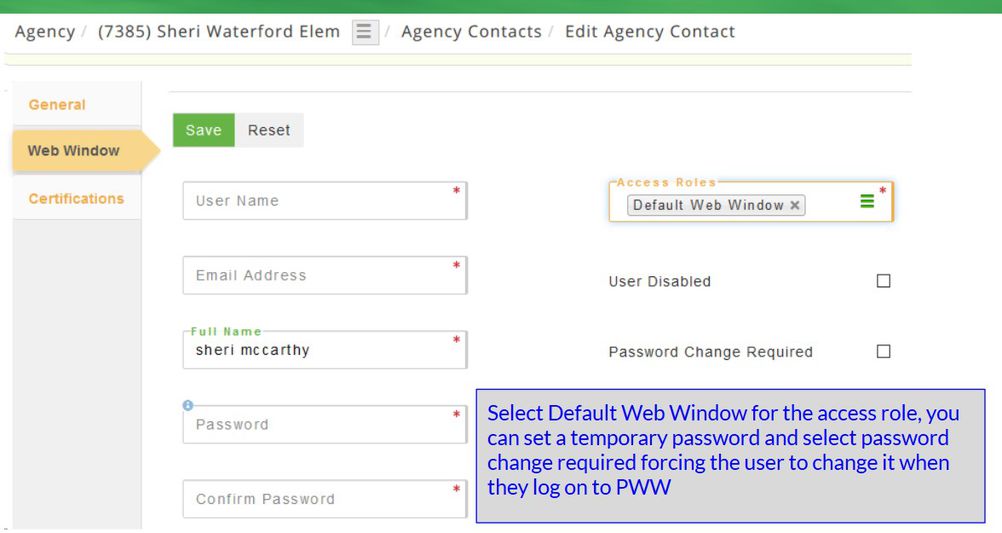
A pin is assigned to a specific agency contact. The pin works with the PWW setup feature that enables the agencies to sign for their orders electronically. This is orders that you drop off (they can enter their pin on the driver's mobile device) or when they pick up at the warehouse-from the order screen there is a option to sign with pin code. The agency contact simply selects their name and enters their pin. This eliminates the need to print out the order sheet, have it signed and file it. The information is retained in P2 if there is ever a need to know who signed for the order.
SERVICE FEES/MARKUPS
Another important area to understand is markup and service fees and how they apply to an agency, product, receipt and how the agency, receipt and product can depend on each other. Every agency must have a service fee and markup set (even if a 0 level or 0 markup). The markup is a percentage normally charged to purchased products. Service fees are based on weight not quantity and usually apply to donated product. Both markups and service fees can be set for the agency, product and/or a receipt. Service fees and markups are set up by the food bank administrator. Receipts and products do not normally see markups and service fees but there is the ability to add them when necessary. HOWEVER, if the Apply Service Fee box and/ or Markup box is not checked in the Product Category setup FIRST then the system will ignore all service fees and markups. These can be changed as necessary.
Process:
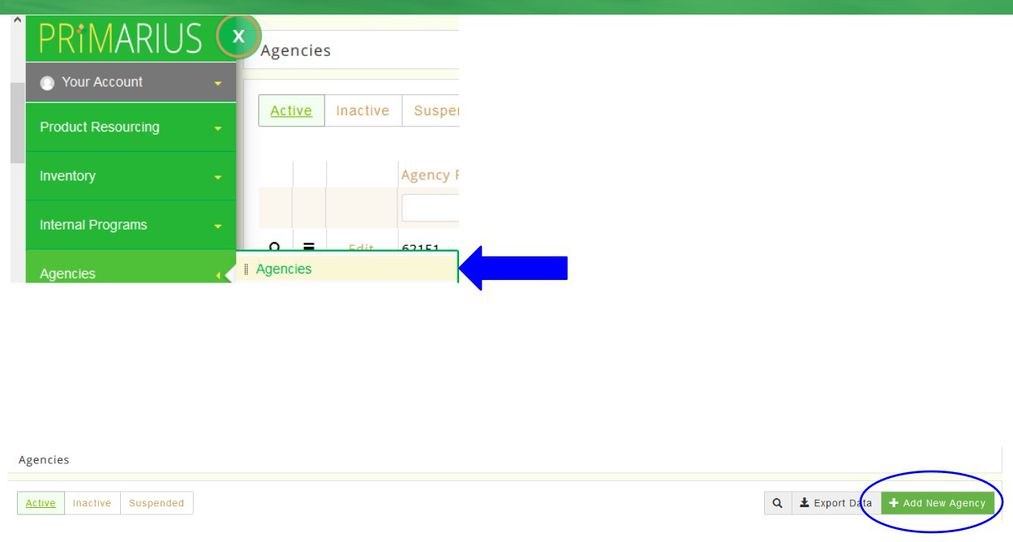
The main page displays all Active agencies and there are tabs to view the Inactive and Suspended agencies as well as options to perform an advanced search, export data and add a new agency.
There are two ways to edit/view/add information about the agency either through the Edit menu or the = Hamburger Menu.
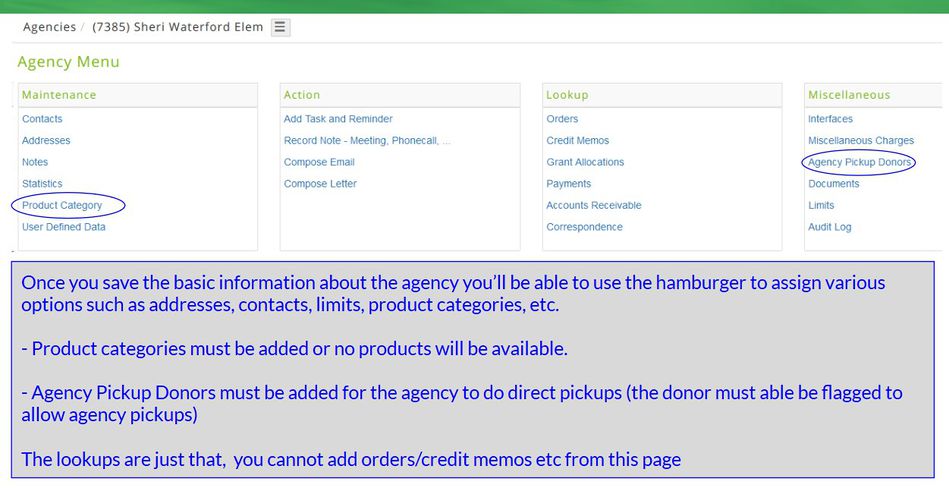
= HAMBURGER OPTION
The = Hamburger gives users quick access to add/edit/view specific details about the agency. Locate the agency then click the Symbol. There are four categories available: Maintenance, Action, Lookup and Miscellaneous. (see below)
EDIT MENU OPTION (the = can still be accessed anytime in the dialogue box)
Locate the agency and click Edit, a new page opens the general information about the agency. If any information is changed click Save and a message displays The record was updated successfully. To edit any details about the agency, locate the agency and click on the = Hamburger and select the field such as contacts and right click to open up a new tab and all contacts are displayed and click Edit, make any changes and click Save.
ADD AGENCY/ADD INFORMATION TO EXISTING AGENCY
To change an existing agency, locate the agency and select Edit, make any changes and Save.
Adding an Agency is a multi step process. Open the Agencies and select + Add New Agency.
The Agency tab is used to set the background up for the agency.
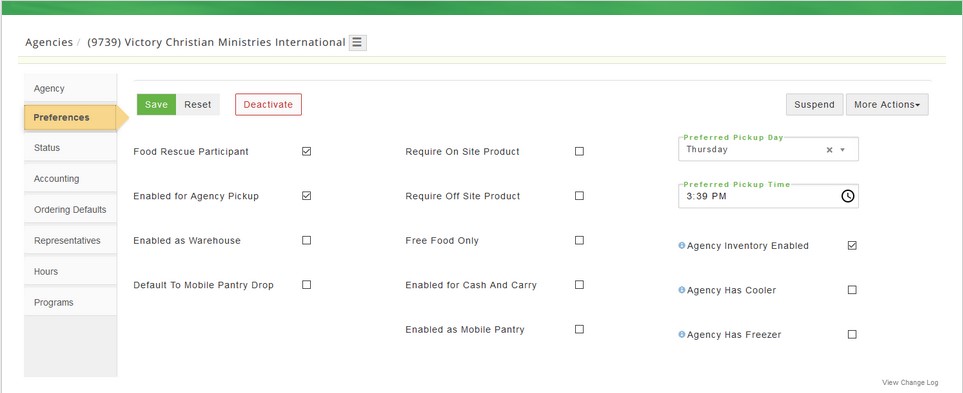
Click Add New Agency. Complete the fields on each of the tabs (there are definitions available for each field in the Definitions section of this page. It is important that you understand what adding or not adding a check mark to a field will do) then click Save and a message displays The record was saved successfully. There are 5 additional tabs displayed: Preferences, Status, Accounting, Order Defaults and Representatives. Complete the tabs, click Save then the active agency tab displays. Note: the MORE OPTIONS drop-down in the right corner. From this drop-down you can print an agency label and generate a statement for your agency.

The Preferences tab has many of the parameters for the agency.
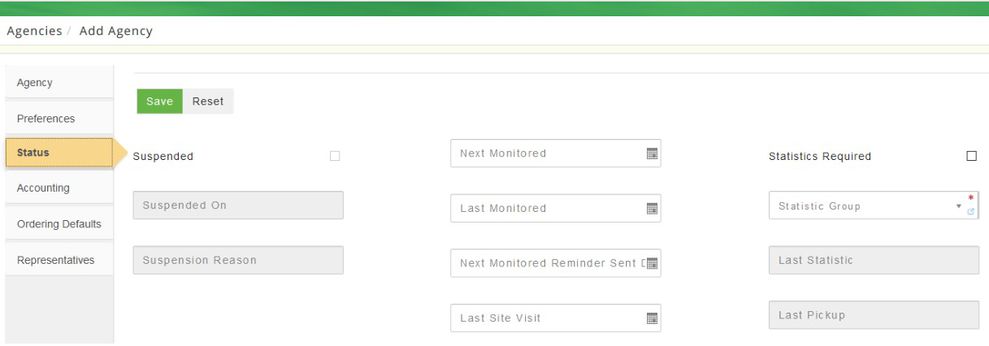
The status tab is where you can enter the monitoring of the agency and assign a statistical group.
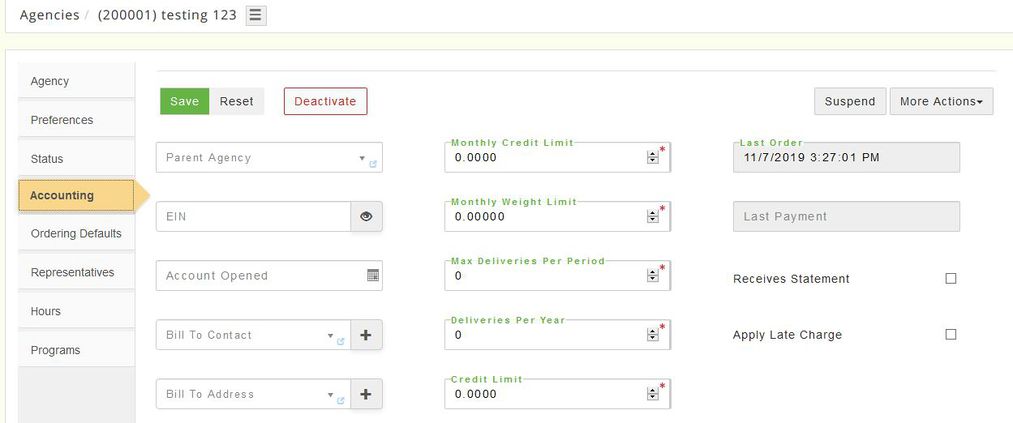
The accounting tab sets parameters for agency orders and if your food bank uses payments terms those are set here as well.
The Order tab is where the service fee (shared maintenance) and markup levels are set. You can also set a default shipping method for the agency (this can be overridden on the order).
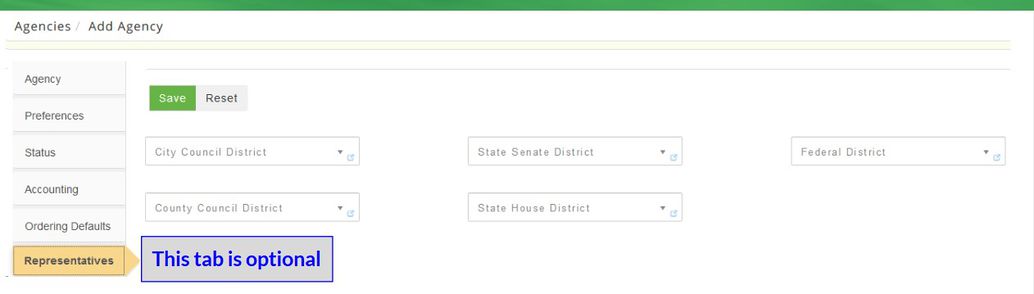
The Representative tab allows the district information to be entered in case your food bank is required to provide distribution based on any of those criteria.
Programs are just a way to trace parent-child relationships in Agencies.
It only shows on the parent card.
Here is where you set the parent relationship.
Then the Children will show here.
ADDING AGENCY DETAILS
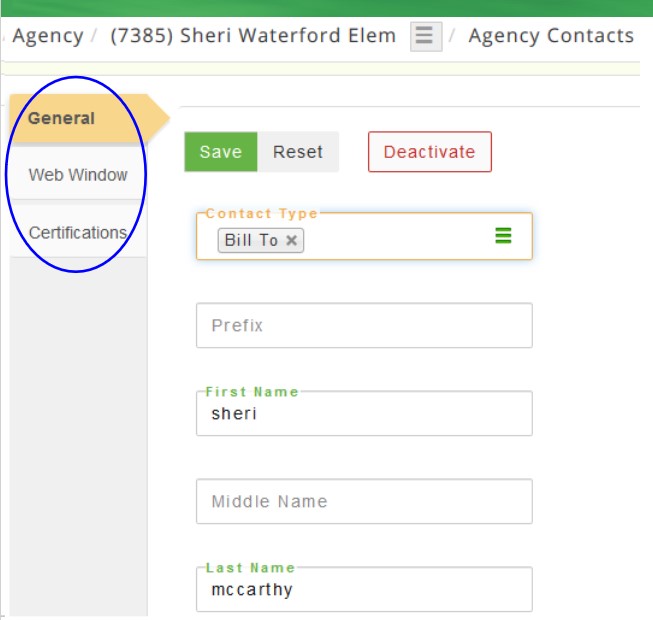
If using the Edit feature to add contacts/addresses you will use the + sign. When completed click Save and a message displays The record was updated successfully and the Active Agency page displays. There are options for both under the Agency tab, the Accounting tab and the Order Defaults tab. A contact only needs to be created once and that person can have multiple roles. It is not necessary to create the same contact with a different role. You can set a pin code for each individual user if your food bank is going to use electronic pin signatures for orders.
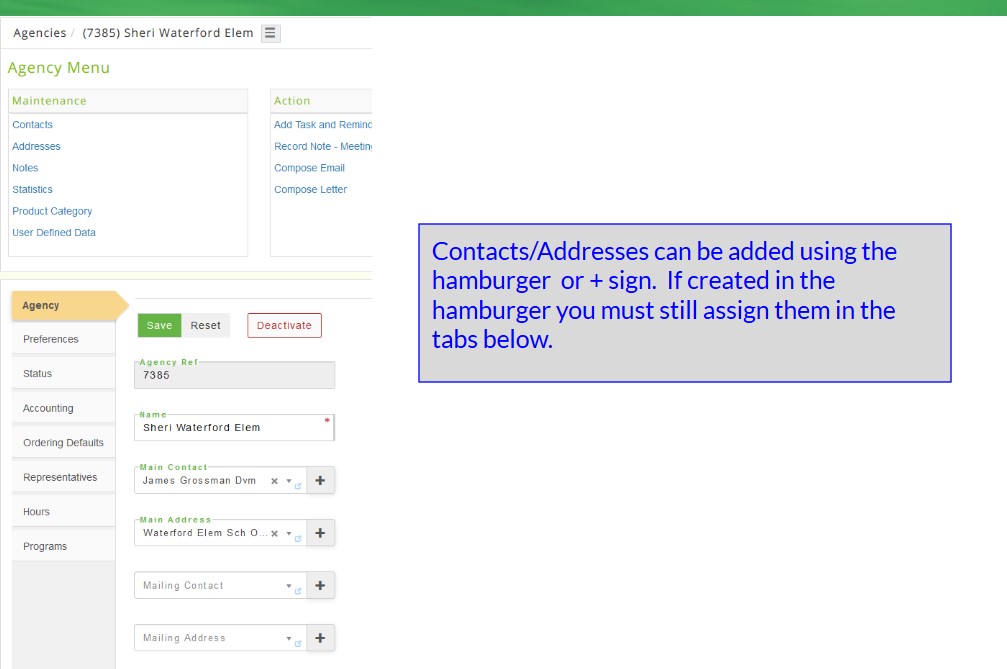
If using the = hamburger select contacts or addresses and then Add New+ (address, contact, note, etc.). Complete all necessary fields then click Save and a message displays The record was saved successfully. When completed click on Agency from the dialogue box to return to the active agency page. Once contacts and addresses have been created it is necessary to set them in the Agency tab, Accounting tab and the Order Defaults tab.
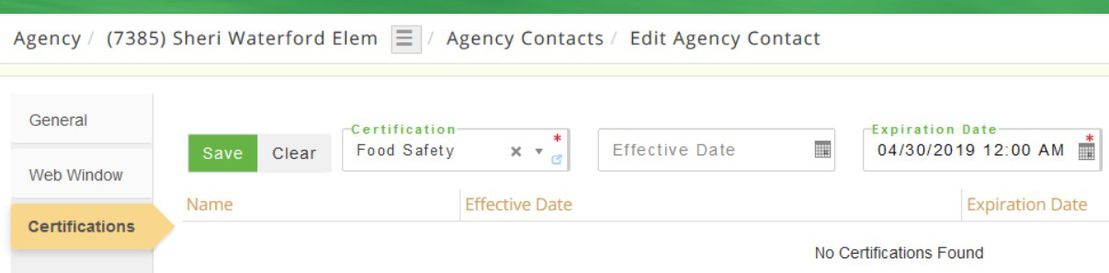
To add agency certifications and PWW access:
Once you create and SAVE a contact, select Edit for that contact again and there are now 2 new tabs; Web Window and Certifications.
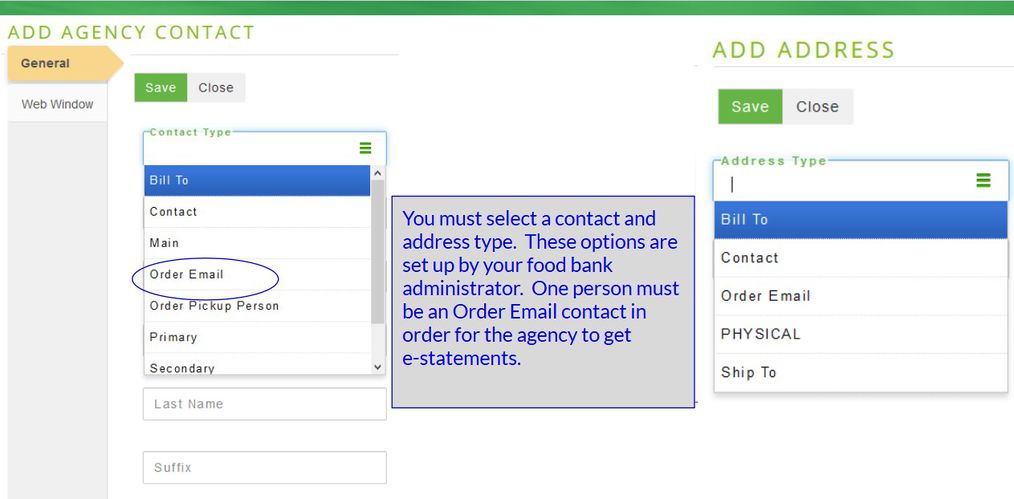
The General tab is where you'll enter the contact information and the types of contacts. A contact can have multiple contact types.
Web Windows is the PWW user information.
The certifications are set up by the food bank administrator. Select from the drop-down and enter an expiration date, the effective date is not required.
ADD PRODUCT CATEGORIES/REMOVE PRODUCT CATEGORIES
Locate the agency and click on the = and select Product Categories and a new page opens the categories assigned to the agency (if any). To add categories, choose from the Product Category ID drop-down box or click the Add All if applicable. To remove a category click on Delete and the system prompts Are you sure you wish to remove this record? Click No to return or click Yes to continue and the product category will be removed. Click on Agency in the dialogue box to return to the main agency page.
Add Retail Pickup Donors
If an agency picks up directly from a retail donor the eligible retail donors must be added using the = hamburger (see the above screenshot). Add all eligible donors (the donors must also be flagged for agency pickup or they won't be on the eligible list). You can limit the number of pickups. 0 is the default which means no limit and click Save.
DEACTIVATE/REACTIVATE/SUSPEND/UNSUSPEND
To deactivate: Locate the agency from the Active tab, click Edit and a new page opens the agency details. Click Deactivate and the system prompts Are you sure you wish to deactivate this agency? Click Cancel to return or click Deactivate to continue and a message displays The record was deactivated successfully.
To deactivate specific information: about the agency such as a contact person, locate the agency and use the = to select the field that needs to have information deactivated. For instance, click on Addresses and all of the addresses for the agency display, select the address that needs to be deactivated and click on Edit and the details about that address display. Click Deactivate and the system prompts Are you sure you wish to deactivate this agency address? Click Cancel to return or Deactivate to continue and a message displays The record was deactivated successfully.
To reactivate: Locate the agency from the Inactive tab, click Edit and a new page opens the agency details. Click Reactivate and the system prompts Are you sure you wish to reactivate this agency? Click Cancel to return to the previous page or Reactivate to continue a message displays The record was reactivated successfully.
To suspend: Locate the agency then click Suspend. A reason must be entered and the date should reflect the time/date for the suspension and the system prompts Are you sure you wish to suspend this agency? Click Cancel to return to the previous page or Save to continue and a message will display The record was suspended successfully.
To unsuspend: Locate the agency from the Suspended tab and click More Actions and choose Unsuspend. The system prompts Are you sure you wish to unsuspend this Agency? Click Cancel to return or Unsuspend to continue and a message displays The record was reactivated successfully.
 Note an agency cannot be deactivated if it has a balance in A/R. If that is the case then the agency can only be suspended.
 Any fields with a * must be completed. Dark grey boxes are view only and cannot be changed.
GIVING AN AGENCY AN INVOICE CREDIT (NOT THE SAME AS A CREDIT MEMO)
Sometimes a situation may arise when you need to give an agency a credit towards a
There are two options for this:
1) From the Agency menu select Payments and click Add New Agency Payment. Select your agency then locate the invoice that you are giving a credit on. Complete the fields just like you were doing a payment -the AR should still be the Accounts Receivable GL account #. It's not necessary to do this daily but it can be or you can wait until the end of the month; then from Agency select Deposit and add a new deposit. The GL Account# for the deposit should be a write off type of GL#. You should only create the deposit for the write off amount because the normal GL # for your agency payment/deposits would be different. If you're not posting to the GL it doesn't matter what GL Account number you use. (Keywords Refund, Partial Refund, Partial Credit, Invoice Adjustment)
2) If you have a misc. charge created for invoice charges (or whatever name you call it) you can create a new order for that agency. Reference the order in the remarks box just so you know why you're doing a credit, and then instead of using the line items select misc. charge instead and enter a negative charge amount, process the order completely. This will negate the charges on a previous order. NOW you will then have to use the agency hamburger and select payments, then choose AUTO apply. This forces the system to find all credits and apply them to invoices (oldest first).
BAD DEBTS
There may be times you have to write off an uncollected A/R. This is a 2 step process. First we need to credit the outstanding agency order with a payment. From the Agency menu select Payment, The A/R account should stay the same one you use for Account Receivable for agency payments, for the actual payment type you can use whatever payment types you created including one called Bad Debt. You will make the payment for the amount of the write off and then go into Deposits and for the Deposit account select your Bad Debt Expense GL instead of your bank account that you would normally deposit to. Post that deposit.
Field Definitions: Right click on the highlighted word to open in a new tab
TAGS:
Agency, Certifications, PWW PWW contact, online ordering contact, web window, NAR