Vendors
Contents
- 1 REQUIRED FIELDS FOR VENDOR SETUP
- 2 Donor or Vendor?
- 3 Process Description:
- 4 Process:
- 5 Field Definitions: Right click on the link to open it on a new tab:
REQUIRED FIELDS FOR VENDOR SETUP
Ref If this field is greyed out it is system generated.
Name Type in a unique name for your vendor.
Status (created in General Elements Setup).
Donor or Vendor?
What is the difference? If you are converting from Classic, donors and vendors were all in one menu. In P2 we have separated them out. When a conversion is run from Classic to P2 all donors/vendors are copied to the P2 Product Donor application. Then the system checks all receipts, if it finds any receipts marked purchased then that donor/vendor from classic is also given a Vendor profile. Products from donors usually have no cost to the food bank and vendors will have an invoice to the food bank. In P2 you can have a donor and on a prereceipt have a purchased item or a donated item, the system will not stop you from adding a product to a prereceipt because it's donated or purchased. However, best practices would be donors give, vendors sell. This is especially helpful in the fact that vendors can have a default donation of purchased and your donors can have a default donation or it can be left blank and filled in on a prereceipt if they have multiple types of originations.
Process Description:
Vendors are used for food bank purchased goods or services that have a cost associated with. There is a shortcut available to access the most used information about a Vendor through the hamburger. Click on the = next to the vendor name and the hamburger displays. Click on any of the categories listed to view details or edit/add information regarding the vendor. If a vendor is suspended for any reason then no purchase orders/receipts/prereceipts will be accepted from the vendor (the vendor will not show up on the active vendor list).
Process:
The main page displays all Active vendors. There are options to view the Inactive and Suspended vendors as well as to perform an advanced search, export data and to add a new vendor.
There are two ways to edit/view information about the agency either through the Edit menu or the = hamburger.
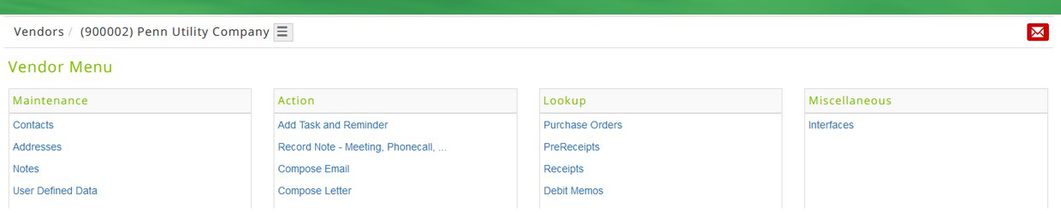
= HAMBURGER
= The hamburger gives users quick access to add/edit specific details about the agency. Locate the vendor then click on the = symbol. There are three categories available for the user: Maintenance, Action, and Lookup. As an example under maintenance, if the user selects Contacts, a new page displays the Active contacts. Find the contact from the grid and click Edit, make any changes then click Save and a message displays The record was updated successfully. From the dialogue box either click on the vendor name to return to the vendor details page and additional contacts can be added or click on Vendors to return to the active vendor page.
EDIT OPTION (the = hamburger can still be accessed with the drop-down arrow next to the vendor name in the dialogue box).
Locate the vendor, click Edit and a new page opens the vendor details. There are three or four additional tabs depending if the vendor is an individual or a company: Details, Preferences, Main Contact/Address and Representatives. Information about a vendor can be changed through these tabs. If changes are made click Save and a message displays The record was updated successfully.
An individual/company can belong to multiple classifications within the food bank, for instance a vendor that supplies products may also volunteer hours to the food bank. There are up to six classifications to choose from: Product Donor, Vendor, Fund Donor, Grantor, Solicitor, and Volunteer. If you want to create more than one classification, click the Add/Edit and select the next classification the vendor belongs to and click Save . To add another classification, click on that individual/company again, add the next category and click Save again. The information about the individual/company is copied to the other classification.
ADD VENDOR/ADD INFORMATION TO VENDORS
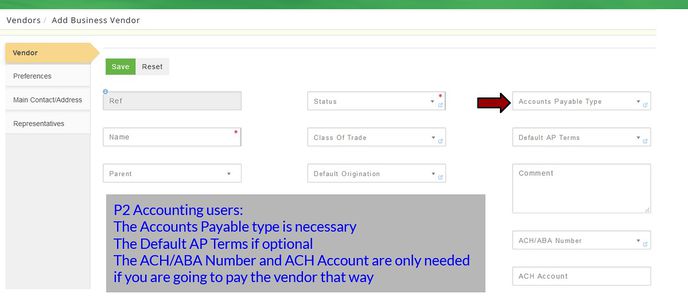
Adding a Vendor is a 2 step process. First the general vendor information is created and then the details about the vendor are added to the profile:
Click +Add New Vendor and select Add Individual Vendor or Add Business Vendor. Complete the fields on the Vendor tab then click Save. A message displays that The record was saved successfully. You cannot complete the other tabs until you save the Vendor tab.
There are 3 or 4 additional tabs displayed depending if the vendor is an individual or a business: Details, Preferences, Main Contacts, Representatives. Complete the tabs, click Save then the active vendor tab will display. When running reports, the more information you add about your vendor the better since you have the ability to sort include/exclude certain fields.
ADDING VENDOR DETAILS
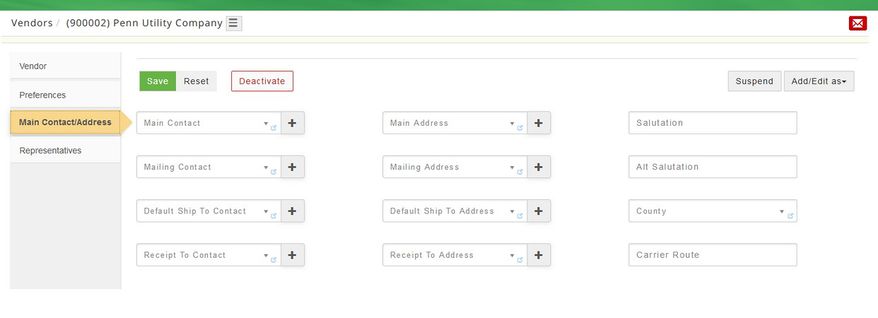
To add information such as billing contacts, shipping contacts or addresses locate the vendor and either use the = Hamburger Menu or Edit to display the product donor details.
If using Edit then select the field being added, click on + and a new page opens, add the information and click Save then Close to return to the vendor details page. A contact can be used for multiple addresses, for instance the mailing contact may also be the billing contact, or ship to contact. Instead of having to retype the information in each field, click the drop-down arrow and that individual's information displays, click on their name. Continue to add any more addresses or contacts. When completed click Save and a message displays The record was updated successfully and the Active Vendor page displays. At this point the address/contacts will not appear in the grid display yet. In order to make them appear, locate the vendor, click Edit and select the Main Contact/Address tab. You will see an option for the Main Address/Mailing Address/ Default Ship to Address and the Receipt to Address. Click on the down arrow key for each of those options and select the contact/address then click Save to return to the Active Product Donors page, the contact/address now appears in the grid.
 **Note: If a prereceipt/receipt was created before the vendor/donor address was added you will have to add the address to the donor/vendor profile then re-open the prereceipt/receipt
  and under Donor/Vendor address select the drop-down arrow to populate the field then click Save.
If using the = hamburger option select the field and a green box displays in the right corner with a + Add New (address, contact, note, etc.). Complete all necessary fields then click Save and a message displays The record was saved successfully. After contacts are added use the hamburg to add addresses (shortcute to navigating the options). Continue to use the = menu to add additional details about the vendor such as notes or set up a reminder or send an email, etc. When completed click on Vendor from the dialogue box to return to the active vendor page.
DEACTIVATE/REACTIVATE/UNSUSPEND/SUSPEND
To deactivate Locate the Vendor from the Active Vendor tab, click Edit and a new page opens the vendor details. Click Deactivate and the system prompts Are you sure you wish to deactivate this Vendor? Click Cancel to return or Deactivate to continue and a message displays The record was deactivated successfully.
To reactivate Locate the Vendor from the Inactive tab, click Edit and a new page opens with the vendor details. Click Reactivate and the system prompts Are you sure you wish to reactivate this vendor? Click Cancel to return or Reactivate to continue and a message displays The record was reactivated successfully.
To suspend Locate the Vendor and click Suspend (A reason must be entered and the date should reflect the time/date for the suspension) and the system prompts Are you sure you wish to suspend this Vendor? Click Cancel to return or Suspend to continue and a message displays The record was suspended successfully (the donor will not display in the drop-down when creating a new prereceipt/receipt/purchase order).
To unsuspend Locate the Vendor from the Suspended tab, click Edit and then click Unsuspend and the system prompts Are you sure you wish to unsuspend this Vendor? Click Cancel to return or Unsuspend to continue and a message displays The record was unsuspended successfully.
All fields marked with * must be completed. Dark grey boxes are view only and cannot be changed.
Field Definitions: Right click on the link to open it on a new tab:
Individual Vendor
Business Vendor
User Defined Fields:
Note All fields on this page are defined by the user in System - User Defined Groups *
*All fields assigned to this group will display. These are custom fields, therefore each group will include a different set of fields with different data types.
Enter the appropriate data for each field and click Save when complete.