Grantor
Contents
REQUIRED FIELDS FOR GRANTORS
Name
Ref
Status (created in System Element Setup)
Process Description:
Grantors are individuals or companies that make monetary donations to the food bank. If you are converting from Classic Primarius this is a new feature, as Classic did not track donors unless you had the donor vantage add-on. With P2 you will be able to track your grants, tie the grant and allocations of the grant back to the donor. Reports will allow you to track the donors, amounts given, amount used and balances remaining of the grant allocations. The Grantor to Grant flow is:
1) Create Grantor.
2) Grantor gives GRANTS (can have multiple grants from a Grantor).
3) Grants get ALLOCATED (this determines how the grant is used. For example the food bank gets a $5000.00 grant however $1000 is to be used by the food bank for equipment and $4000 is to be used to cover agency orders so you would create 2 allocations for this grant).
Process:
The main page displays all Active Grantors and there are tabs to view the Inactive and Suspended grantors as well as options to perform an advanced search, export data and to add a new grantor.
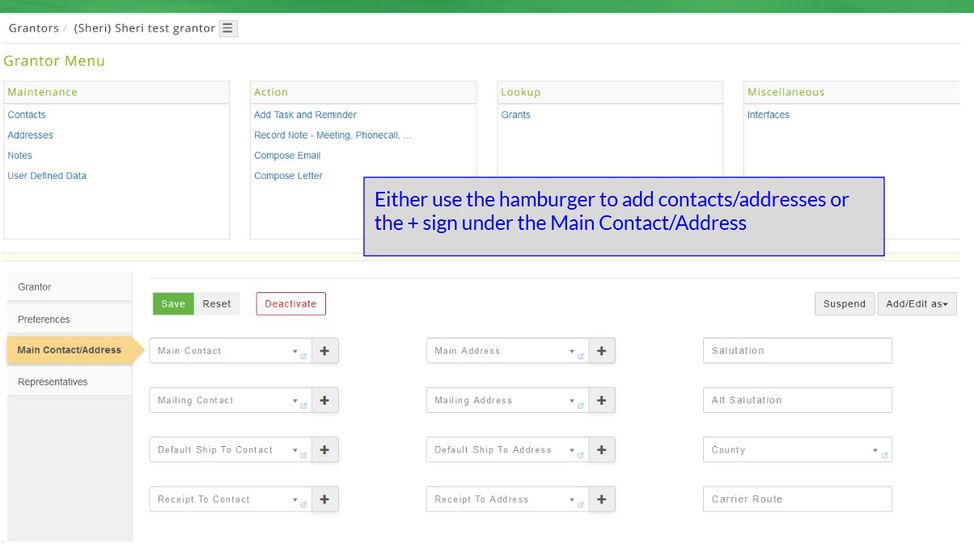
There are two ways to edit/view information about the grantor either through the Edit menu or the = hamburger.
HAMBURGER OPTION
The = hamburger gives users quick access to add/edit specific details about the grantor. Locate the grantor then click the = Symbol. There are three categories available: Maintenance, Action, and Lookup. Select a category to display such as Contacts and a new page displays the Active contacts or click Inactive to view the inactive contacts. Select the contact to view/edit from the grid and click Edit, make any changes then click Save and a message displays The record was updated successfully.
EDIT MENU OPTION (the Hamburger menu can still be accessed anytime next to the grantor name in the dialogue box).
Locate the grantor then click Edit and a new page opens with the grantor details. There are three or four additional tabs depending if the Grantor is an individual or a business: Details, Preferences, Main Contacts and Representatives. If changes are made click Save and a message displays The record was updated successfully.
An individual/company can belong to multiple classifications within the food bank, for instance a vendor that supplies products may also volunteer hours to the food bank. There are up to six classifications to choose from: Product Donor, Vendor, Fund Donor, Grantor, Solicitor, and Volunteer. Click the Add/Edit and select the next classification the vendor belongs to and click Save. To add another classification click on that individual/company again, add the next classification and click Save again. The information about the individual/company is copied to the other classifications.
ADD GRANTOR/ADD INFORMATION TO EXISTING GRANTOR
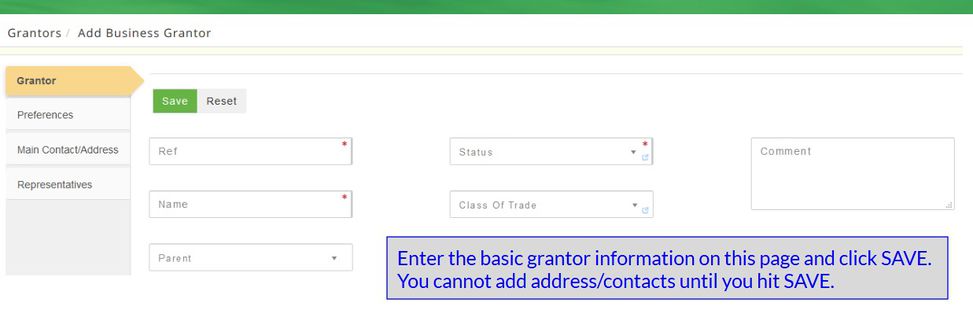
Adding a Grantor is a 2 step process. First the general grantor profile is created and then the details about the grantor are added to the profile:
Click on +Add New Grantor and choose Add Individual Grantor or Add Business Grantor. Complete the fields on each of the tabs then click Save. A message displays The record was saved successfully. There are 3 or 4 additional tabs displayed depending if the grantor is an individual or a business: Details, Preferences, Main Contacts, Representatives. Complete the tabs and click Save and the active grantor grid opens.
ADDING GRANTOR DETAILS
Locate the Grantor and select either the Edit or = hamburger menu option.
One contact can have multiple roles. It is not necessary to have a contact listed more than one time.
DEACTIVATE/REACTIVATE/SUSPEND/UNSUSPEND
To deactivate Locate the grantor from the Inactive tab, click Edit and a new page opens the grantor details. Click Deactivate and the system prompts Are you sure you wish to deactivate this grantor? If no click Cancel to return to the previous page or click Deactivate to continue and a message displays The record was deactivated successfully.
To deactivate specific information about the grantor such as a contact person, locate the grantor and use the = to select the field that needs to have information deactivated. For instance, click on Addresses and all of the addresses for the grantor are displayed, select the address that needs to be deactivated and click on Edit, the details about that address display. Click on Deactivate and the system prompts Are you sure you wish to deactivate this grantor address? Click Cancel to return or Deactivate to continue and a message displays The record was deactivated successfully.
To reactivate Locate the grantor from the Inactive tab, click Edit and a new page opens the grantor details, click Reactivate and the system prompts Are you sure you wish to reactivate this grantor? Click Cancel to return to the previous page or Reactivate to continue a message displays The record was reactivated successfully.
To suspend Locate the grantor then click Suspend. A reason must be entered and the date should reflect the time/date for the suspension and a message will display Are you sure you wish to suspend this Grantor? Click Cancel to return to the previous page or Suspend to continue and a message displays The record was suspended successfully. (the grantor will not be accepted in Receipt entry if an attempt to enter a donation from this grantor is made).
To unsuspend Locate the grantor from the Suspended tab and click Unsuspend. The system prompts Are you sure you wish to unsuspend this Grantor? Click Cancel to return or Unsuspend to continue and a message displays The record was reactivated successfully.
All fields marked with a * are required. Dark grey boxes are view only and cannot be changed.
Field Definitions: Right click on the highlighted word to open in a new page
Individual Grantor
Business Grantor tab
Special Notes:
System Setups:
Company Setups:
Lock References