Orders
Contents
REQUIRED FIELDS FOR ORDERS
Order Ref
Warehouse (created in Inventory - Warehouse)
Pickup Warehouse (created in Inventory - Warehouse)
Shipping Method (created in System Element Setup)
Process Description:
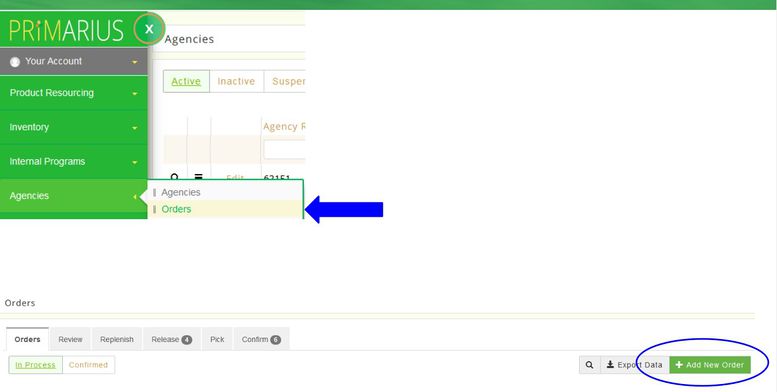
The main page displays all In Process orders and the grid displays information about the order. There is an option to view the Confirmed orders as well as to perform an advanced search, export data and to add a new agency order.
USING PIN CODES:
If your food bank enables pin codes, your agencies can sign for the orders electronically. This eliminates the need to print invoice and having the agency sign for them.
SETTING UP PIN CODES
From the agency hamburger-select the contact and assign a 4 digit pin.
From Setup-General Setup-PWW Check mark Use Agency PIN Code. ALSO you can have P2 confirm orders once the pin code is entered (saving you an additional step of confirming the order).
HOW TO USE PIN CODES
The order must be in the picked complete status (meaning it's all ready to be delivered/picked up).
If the order is being delivered, the driver logs into P2 with an electronic device, pulls up the order and select Sign By Agency. This brings up a menu of all of the agency contacts, the agency person selects their name and types in their pin.
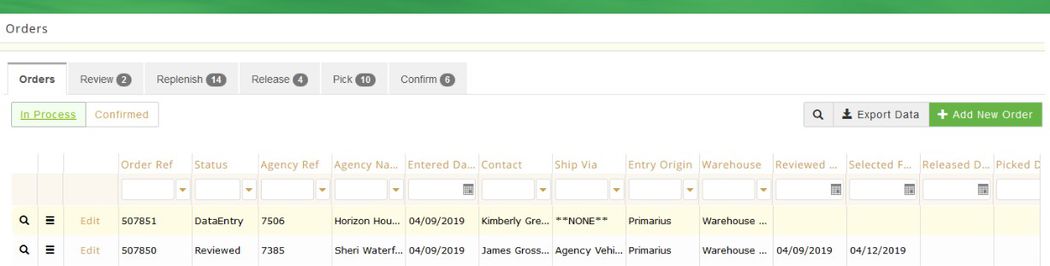
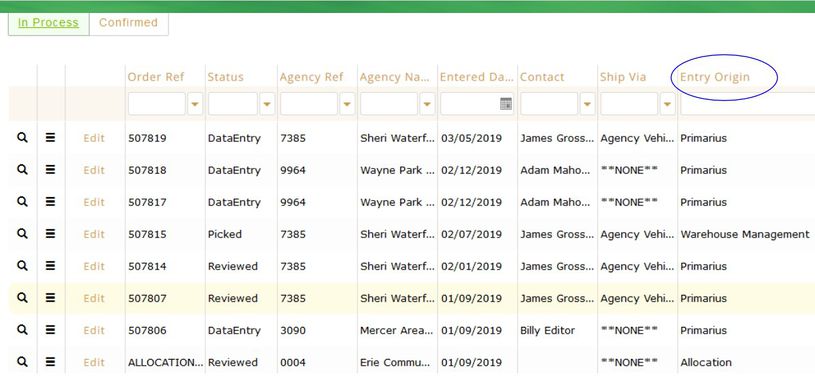
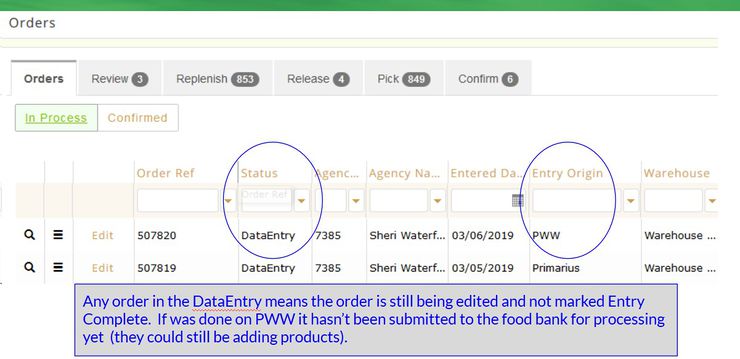
The Entry Origin on the grid displays how the order was received. (If your food bank converted from Classic Primarius you might see RTO in the entry origin, this is the same as "Primarius" in P2).
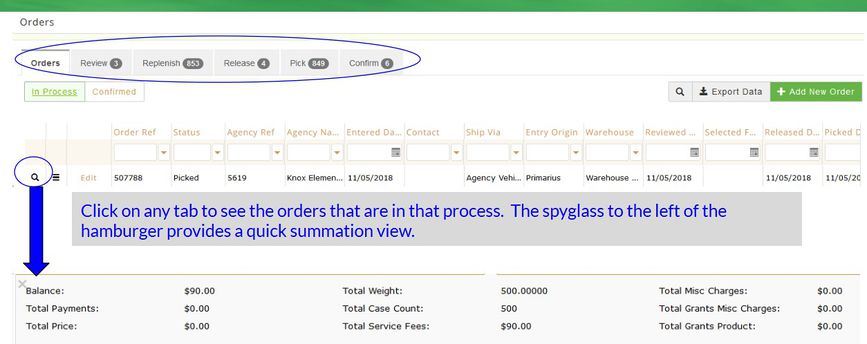
The numbers in the tabs located at the top of the grid give a break down of how many orders are in that status except for bar code users. The replenish tab will not decrease until the order is marked picked. It does remain checked once the order is selected for replenishment.http://wiki.goprimarius.com/mediawiki/index.php?title=Orders&action=edit#
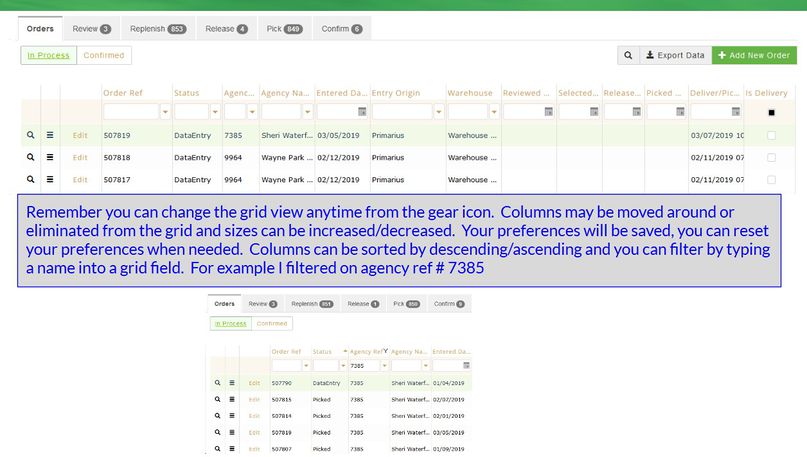
If you used the older version of Primarius the grid would display a column with a Y/N and a date. P2 puts a completed date for each process of the order and displays who reviewed/selected/released and confirmed the orders. If a field is blank it has not been completed yet, the Selected By column is only used for bar code users.
Depending on the food bank setup, grants can automatically be applied to orders. If your food bank uses that option you have the ability to remove a grant from any order whether for fees/products or both. This option is set by the food bank administrator in the Setup - General Setup - Orders.

Process:
ORDER PROCESSING
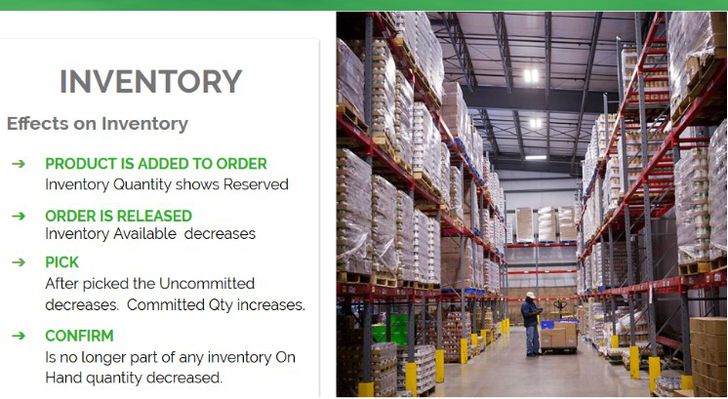
1) Order The order is placed. After all products/charges are added to the order it gets marked Entry Complete.
2) Review is used only for orders that were placed through PWW. This allows the food bank to see what the agency is requesting before proceeding with the order.
3) Replenish This is used to determine what products need moved from a Bulk location to a Pick location. It is intended to make sure there is enough product in a PICK location so the order selector does not have to wait for product to be delivered from BULK in order to pick an order without interruption. The number in the replenish tab does not decrease once an order is selected for replenishment. If an order has a check mark then it has been sent to the warehouse for replenish. It is up to the warehouse workers to complete the replenishment list.
4) Release Click the release tab to allow the order to go through. A message displays The order was successfully released. First Print the pick list then click Finalize.
5) Pick Once you have physically picked an order you must set it as Picked. This commits the product to the order. A delay in setting the order to picked will affect FIFO inventory and possibly pricing. A message displays The order was successfully marked as picked. An order should be picked within a couple of days of releasing the order.
6) Confirm When the order is being picked up or shipped out click Confirm. This removes the product completely from the inventory and invoices the agency. (You CANNOT confirm an order if the pickup date is in the future, the system will give you an error to change the pickup date.)
EDIT/VIEW
Locate the order, click Edit and a new page opens the order details. The Line Items tab gives specific details of what products and quantities are on the order. It also displays any fees associated with the product. To change an item ordered, click Edit and the Order Detail page opens. The Additional Product information fields are view only and cannot be changed. Items can be added to an order up until the order is confirmed.
Add Credit This is used to issue a credit memo back to the agency (shortage of products, returned products, etc.) from a confirmed order.
Apply Grants Select this to apply a grant to the order. The system verifies the agency/products/fees is eligible, you can use this or manually apply a grant however, the auto apply can sort through all eligible grants and determine which grant to use first. It takes the expiration date of the grants into consideration.
Delete and Reapply Grants This option clears out the applied grants and reapplies any eligible grants to cover all of the products. This is useful if a change has been made to the ordered items or if a grant has been changed (expire date was added, new grant was added, etc.).
Copy Allows the order to be copied to a new order. If issued with the copied order the following will happen:
Pick Allows the order to be set to pick for the warehouse.
Pick by Storage Select the storage codes set up in the system and click Pick Selected.
Email Invoice Select to send the invoice to the agency via email.
Print Options
The Print Bar Code Selection Labels is for bar code users only.
The Print Pick List indicates to the warehouse all items and the quantities to be picked for this order.
The Print Invoice will print the agency invoice. It's best to print the invoice AFTER the order is marked picked complete or confirmed to ensure you're not adding/removing products that could change the billing amount.
ADD NEW ORDER
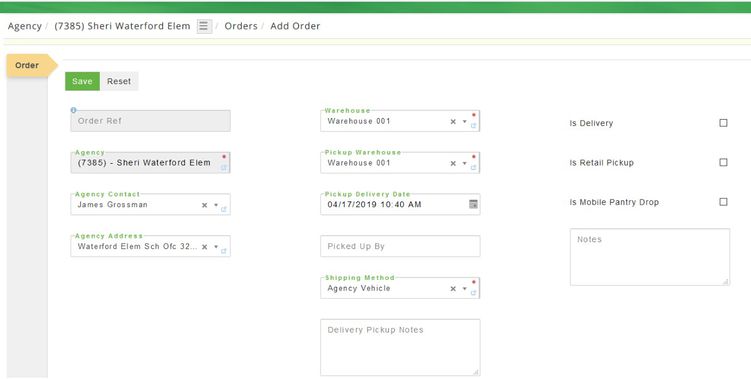
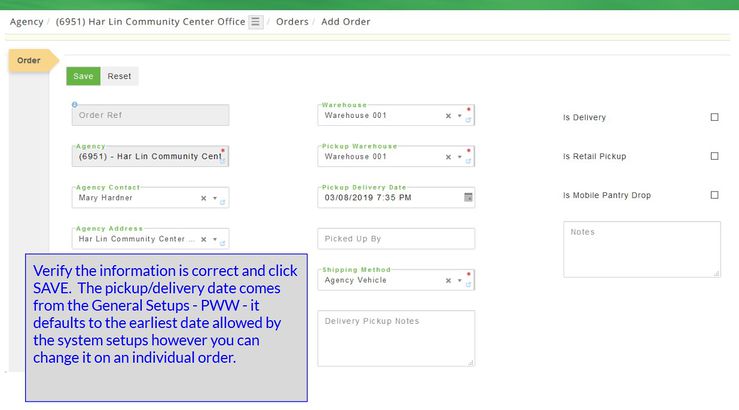
Creating an Order is a multi-step process. First the general order information is created and then the details about the order are added: (You must change that date if the pickup/delivery is going to be earlier then the defaulted date or you will get an error when you confirm the order).
Open the Order application and select + Add New Order and select the agency.
After you select the agency the orders tab populates. Verify the fields on this page and make any necessary changes then click Save.
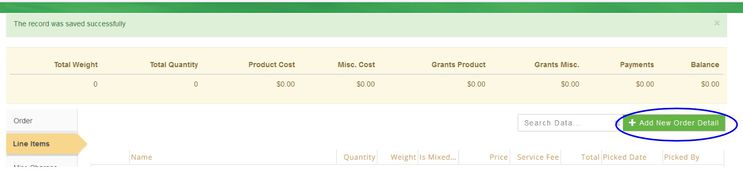
To add the product select + Add New Order Detail.
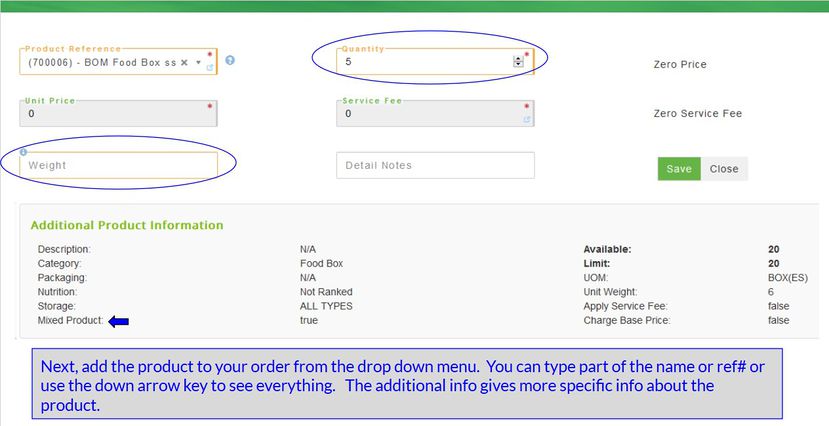
In the screenshot below I picked a produce # 700006 which is a mixed weight product therefore I must enter the total quantity and total weight. If you leave the weight zero you will throw off the inventory. If the service fee is greyed out you do not have permission to change it. If you need to change it contact your food bank administrator.
Once all products are entered click SAVE.
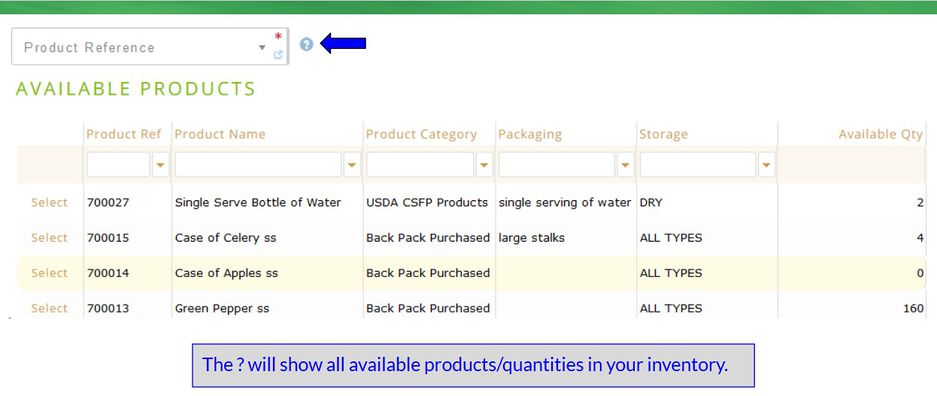
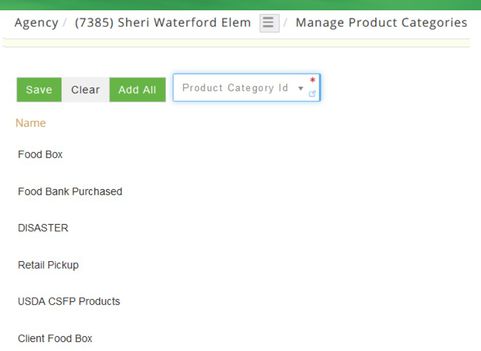
An agency can only order product categories assigned to them in the Agency setup. This is a screen shot from the Agency setup. So if your not seeing products you know you have this could be one of the reasons it's not showing up on the list of products.
If that isn't the cause, next check to make sure the receipt is not on hold or that the product is not flagged "Cannot Order" (from the product's hamburger-warehouse; lastly ensure that there is available inventory (from the product's -hamburger-inventory).
MIXED PRODUCT AND FOOD BOX EXCEPTION: When selling a MIXED product you must enter the quantity and the weight or if you have a food box that is considered mixed product (mixed is checked on the product setup) you will enter the total number of food boxes and enter the total weight of all the food boxes combined. Below I entered 5 boxes (there are 20 available, the "guesstimate" weight is 6lbs ea.) however, I need to weigh all 5 boxes and enter the total Weight.
After all products have been entered click Close. There are additional tabs available.
COMBINE ORDERS: Combine orders is used when the same agency has multiple orders that have been Reviewed but not Picked. Only on these orders will you see the Combine Orders tab. If an order has not been Reviewed or has been marked as Picked you CANNOT combine the orders. Before combining orders, all grants must be removed on the individual orders, as well as misc. charges. Once the orders are combined (and now just one invoice) you can then add grants and misc. charges to the one order. The other order numbers are made inactive and you will not see them in the system however, they will be added to the Notes filed on the order. One invoice is created for the all of the combined orders.
FOR BAR CODE USERS:
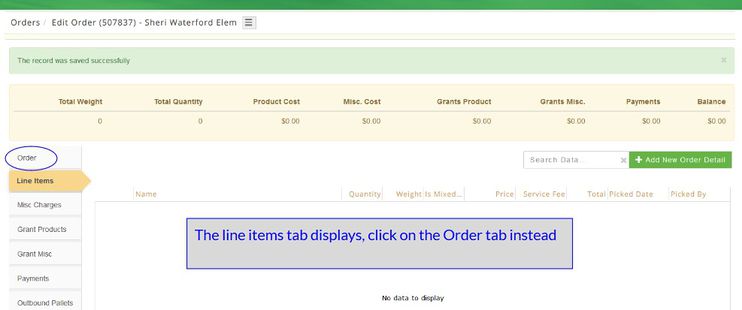
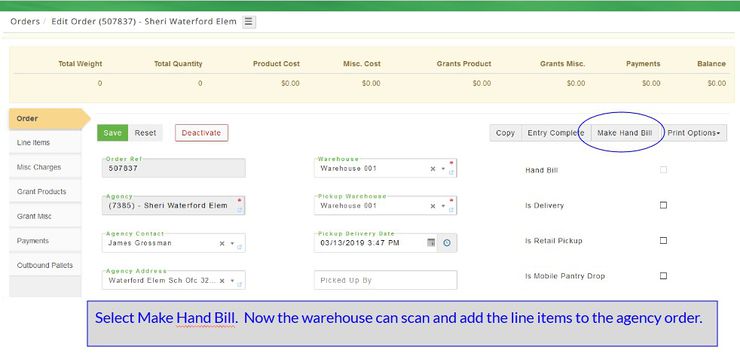
To use a handbill, create the order template and click Save. The system automatically displays the line items tab, just click back on the Order tab and select Make Handbill and then Save.
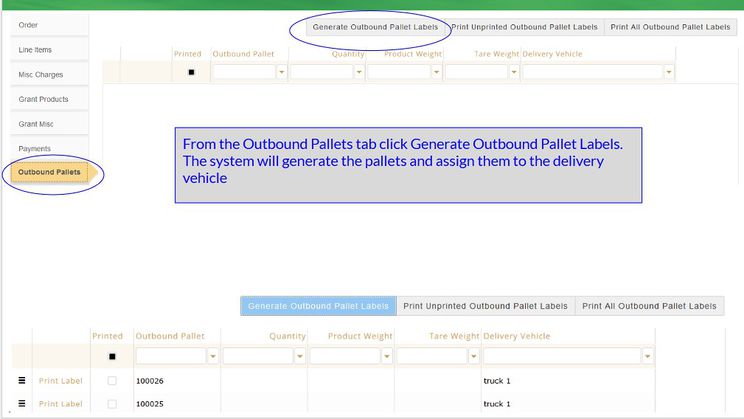
If you are using outbound pallets, once you've added all products to your order then return to the Orders tab and enter the # of outbound pallets to generate then click Save. You must then reopen the order using the Edit feature and select Outbound Pallets tab and generate your pallet labels. If you try to click create outbound pallet labels before entering the # of you'll get an error there are no labels to print! Outbound pallets is strictly used for weight load management in conjunction with Delivery Vehicles and Delivery Loads found under Scheduling.
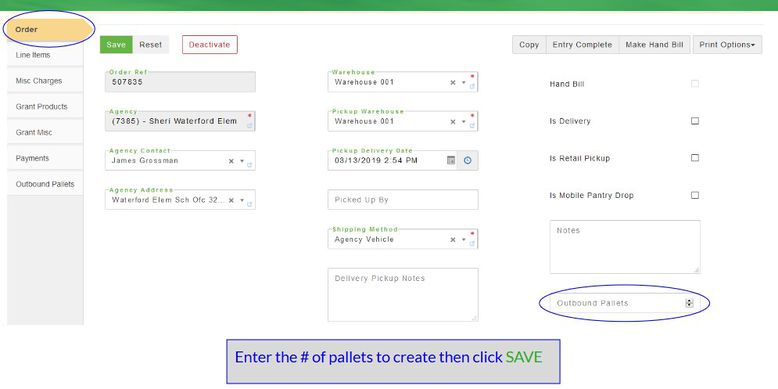
After the order has been saved and you open the order again go to the pallets tab: If you set a default delivery vehicle for warehouse it will appear on this page. HOWEVER, it's not required and if you have multiple vehicles you probably don't want to have a default one. The outbound pallet label can be printed multiple times. The initial printing will allow you to pick an order and get it on the correct pallet. Then AFTER you use the delivery vehicle loads and select a date/vehicle you can reprint the label and the truck information will then populate on the label for loading purposes.
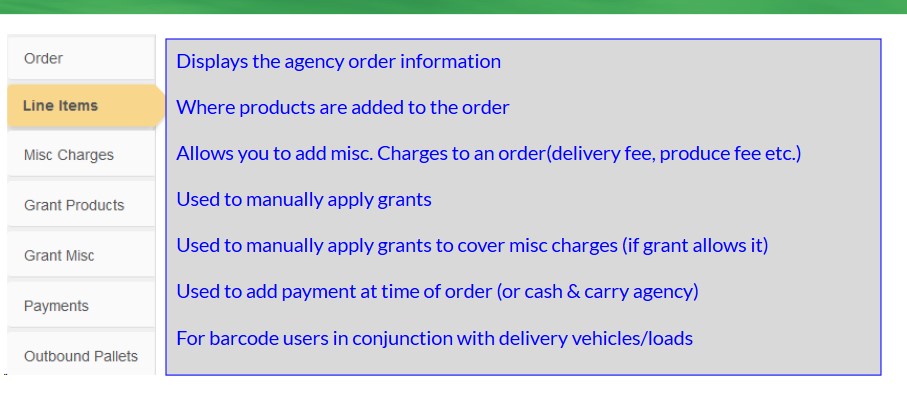
If applicable add any of the following:
Misc. Charges Click +Add New Misc Charge to add any miscellaneous charges to the order click Save and a message displays The record was saved successfully. Click Close when completed. Misc. Charges are created by the food bank administrator in the System Element setup.
Grant Products If the food bank setups are not set to automatically apply grants to orders you can add them manually. Click +Add New Order Detail Grant to add any grant allocations to the order. The Add Order Detail Grant Allocation opens. Select the Order Detail product that the grant allocation applies to, click Save and a message displays The record was saved successfully. Click Close when completed. If a grant is applied in error it can be deactivated by locating the order; click Edit and from the Grant Products tab locate the item and click Edit then Deactivate . The system prompts You are about to navigate away from the current page and any unsaved changes will be lost. Are you sure you wish to leave this page? Select No to cancel or Yes to continue and the system prompts Are you sure you wish to deactivate this order detail grant allocation? Click Close to return or Deactivate to continue and a message displays The record has been permanently deleted.
Grants Misc Click +Add New Order Misc Grant to manually add grants that will cover miscellaneous charges.
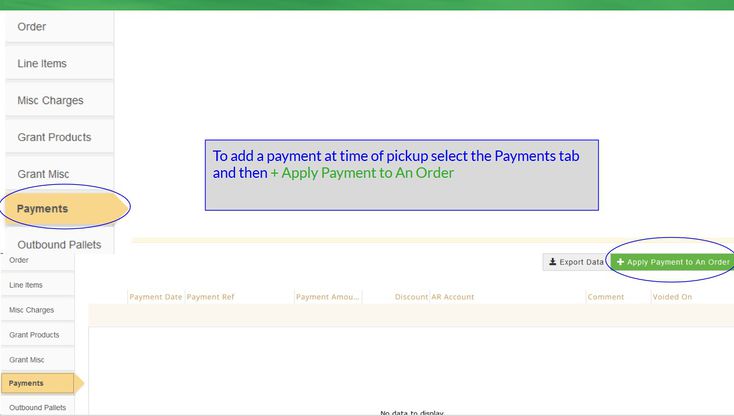
Payments Click +Add New Payment to Order if there is a payment made to the order such as for cash and carry customers and is intended to only be used when a payment is presented at the time the order is picked up or checked out. ** This is a 2 step process. You must first put that there is a payment to apply to the order then you must enter the payment details using Add Agency Payment.
FOR AGENCIES THAT PAY AT THE TIME OF PICKUP
Click +Add Order Payment. This will be used primarily for cash & carry agencies. Most agencies will be billed by the food bank and those payments would normally be processed by using the Payment option under Agencies.

When all items and charges have been added to the order click the Order tab and click Entry Complete . However, if items need to be added later only click Save . This allows you to return at a later time to add more product(s). The order is now in the system and can be updated as it progresses, see ORDER STATUS above for an order flow explanation. It is possible to add items even after entry complete. Items can be added/removed up until the order is Confirmed.
PROCESSING THE ORDER (see order process above for information regarding the steps)
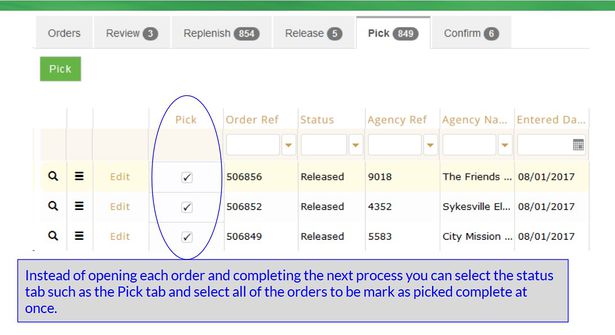
You can process an individual order by clicking Edit on the order or you can process multiple orders at once by going to the process tab and selecting all orders to process and then click the green (review/replenish/release/pick/confirm) box. An order is not confirmed until it has physically left the building.
Exception: If the order needs to be picked by storage location then the Edit feature must be used instead of the Pick Tab (unless your Warehouse setups is flagged Pick by Storage Location).The edit option will give Pick or Pick by Storage options.
BAR CODE USERS-CREATING A HANDBILL ORDER
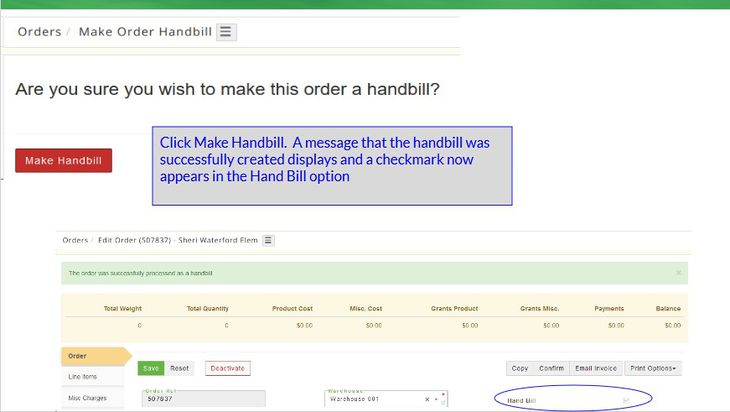
If you want to create a blank order for a handbill then click + Add New Order, select the agency then verify the information on the order template and click Save. The Line Items tab displays, instead of adding the items click on the Order tab and select Handbill and then Save. This allows the warehouse person to add products to the order via the warehouse scanner.
Select + Add New Order and locate the agency.
Instead of using the Line Items tab click on the Order tab.
ORDER STATUS
Locate the order and click Edit, a grey box with the next step of the order process displays in the upper right hand next to the Print Options drop-down. The Open Orders Grid Status also displays the current status, for instance, if the order status is DataEntry that means the order was entered but not marked Entry Complete yet. Once marked Entry Complete, orders can be completed using the Edit feature or through the tabs.
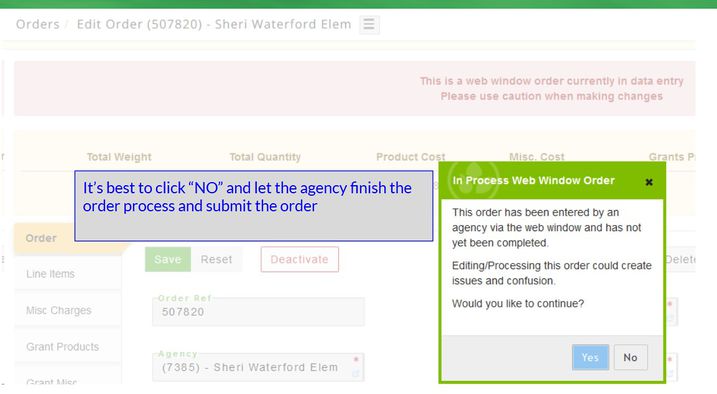
This is what happens if you click on a PWW order that is still in the Data Entry status.
When the order is ready to be picked, locate the order on the Pick tab and put a check mark in the box and click Pick a message displays The order was successfully marked as picked and now the order moves to the Confirm tab.
When the order is ready to be confirmed, locate the order and put a check mark in the box and click Confirm a message displays The order was successfully confirmed. (the product has physically left the warehouse.)
Exception: If the order needs to be picked by storage location then the Edit feature must be used instead of the Pick Tab (unless your Warehouse setup is flagged Pick by Storage Location). The edit option will give Pick or Pick by Storage options.
DEACTIVATE/CANCEL AN ORDER/ITEMS ON AN ORDER
To deactivate or cancel an order locate the order and select Edit and a new page opens the order details. To cancel the complete order click Deactivate. The system prompts Are you sure you wish to deactivate this order? Click Cancel to return or Deactivate to continue and a message displays The record was deactivated successfully.
To deactivate only certain items locate the order and select Edit and a new page opens with the order detail. Choose the Line Items tab, find the product(s) that needs to be removed and click Edit, the Edit Order Detail page displays then click on Deactivate. The system prompts You are about to navigate away from the current page and any unsaved changes will be lost. Are you sure you wish to leave this page? Click No to return to the previous page or Yes to continue and the system prompts again Are you sure you wish to deactivate this order detail? Click Close to return or Deactivate . to continue. This is a system check to ensure a product is not deactivated in error. If you click Deactivate the product is removed from the Line Items display.
CANCEL A GRANT PRODUCT APPLIED TO AN ORDER
If a grant was incorrectly applied to a product or a miscellaneous charge it can be removed without affecting the ordered products. Locate the order, click Edit then select either the Grant Products tab or the Grants Misc tab depending on what needs to be corrected. Any products that have been covered by the grant displays in the grid. Locate the product and click Edit then choose Deactivate. The system prompts You are about to navigate away from the current page and any unsaved changes will be lost. Are you sure you wish to leave this page? Click No to return or Yes to continue and the system prompts Are you sure you wish to deactivate this order detail grant allocation? Click Close to return or Deactivate to continue and a message displays The record was permanently deleted. Click on the Order tab to return to the details page.
CREDIT MEMO
A credit memo can be used in two ways. If the agency was shorted a product/returned a product you would issue a credit memo to them and any associated fees/costs would be credited back to the agency. Also, if you inadvertently confirmed an order for the wrong agency you would use a credit memo to remove all of the products from the invoice which will credit the agency for any associated costs and puts the product back into inventory so you can create the order for the correct agency. IF the product needs to be disposed then you will need to do an inventory adjustment to remove the product from inventory and put into spoilage/waste/disposal of inventory.
Locate the completed order and click Edit and the order detail displays. Click Add Credit and type in a reference (if this field is greyed out it will be system generated, this is determined by the system administrator) and click Save and the Line Items tab displays. Click +Add New Credit Memo Detail and complete the fields. The drop-down contains all products on the order, select the Product (Ref) Name then type the negative quantity being credited back to the agency (and added back into inventory). Add any additional notes and then click Save and a message displays The record was saved successfully. When all credits have been added click Close to return to the Line Items tab. After verifying all the information is correct select on the Details tab and click Entry Complete and Confirm and a message displays The transaction was successfully confirmed. There are options to print and email a copy of the credit memo. Credit Memos will credit the agency only even if a grant was used to cover the costs/fees.
Fields marked with a * must be completed. Dark grey boxes are view only and cannot be changed.
Field Definitions: Right click on the highlighted word to open in a new tab
ORDER STATUS
Data Entry This status displays when items have been added to the order but the order has not been marked complete (items can be edited or added).
Entered The order was marked Complete and the order is ready to be reviewed.
Reviewed The order is ready to be reviewed, changes can still be made to the order. (PWW only)
Released Once the order is reviewed it can be released.
Picked The physical items on the order are ready to be picked and packed for the agency. The products are now committed to the order.
Confirmed The physical items have left the food bank
Grant Products tab (this is used to apply grants manually to the order vs using the Apply Grants option from the main Order tab.)
TAGS:
void cancel remove replenish replenishment handbill hand bill