General Setup
Contents
Overview:
The General Setups page allows you to establish and customize behind the scenes functions of Primarius and base information used throughout the system. For Classic customers, these settings were found in the DSA. General Setups is divided into 14 areas designated by the tabs running down the left side of the page. Each of the areas are explained below. Any field marked with a red asterisk (*) is required for functionality. PLEASE NOTE: Completing information in many of the optional fields will increase your ability to collect, track, report and communicate information in Primarius.
General
The general tab establishes the main information about your organization and a few broad options for how the system should operate.
Name* Enter the name of your food bank as you would like it to appear throughout the system.
Address Line 1 & 2 Enter the main address of your food bank.
City Enter the city name of where your food bank is located.
State or Province From the drop-down select the U.S. state or Canadian province.
Postal Code Enter your five or nine digit postal code associated with the main address.
Default Time Zone* Select from the drop-down list the time zone in which your food bank operates.
Country Select from the drop-down menu.
Telephone/Telephone Ext Enter the area code and main phone number for your food bank.
Fax Enter area code and the main fax number for your food bank. If your food bank no longer uses fax, this can be left blank.
Contact Enter the full name of your P2 administrator or the main contact for P2 at the food bank.
Feeding America Affiliate Id All Feeding America (FA) affiliated food banks are assigned an Id number. Enter your food bank's FA number here.
Blue to Feeding America Email Enter in the email address to be used when sending blue receipts to FA.
Credit/Debit Indicators As Suffix If checked a Credit Memo (CM), Debit Memo (DM), Membership Fee (MF) or a Finance Charge (FC) reference will end with the letters CR, DM, MF, or FC. When not checked, it will be a prefix for the reference. 12345CR vs. CR12345.
Lock Auto Assigned References If checked, prevents a user from changing any auto assigned reference numbers for orders, invoices, agency records, donor records, vendor records, etc.
Default Product Covered by Grant If you check this box then anytime a product is added it will automatically have a check mark in the Product Covered by Grant field however, it can manually be removed from an order.
Product Prefix This is used when creating a product. Check to allow the user to create a 1 to 3 character prefix and the system will generate the remaining numbers (BEV1234) (BEV1122) (BEV123456) (Hol9999) if Auto generate is turned off and you use a prefix the system will use the next product reference anyways. If the Product reference is 4 or more characters the system treats that as an actual reference number not a prefix.
Required Typed Password Since some browsers allow passwords to be saved, you can require your employees to enter their passwords when logging in each time instead of allowing the browser to save the password.
Enable User Forgot Password can be enabled/disabled. Depending on the check these are the screenshots the users will see if they click Forgot Password:

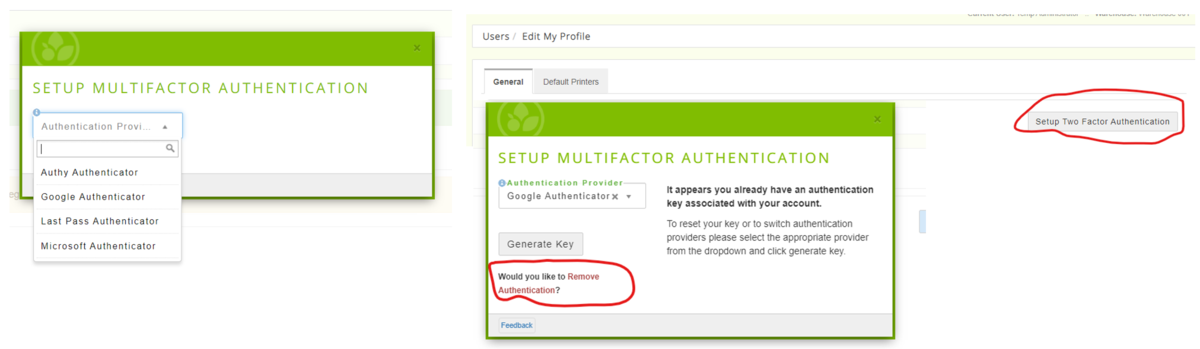
Require Two Factor Authentication for Core Users Requires users to use a third-party authenticator app to open the login screen before entering their username and password. When checked, a pop-up window will have you select one of four available authentication providers as seen in the screenshot below. Once a provider is selected, a QR Code will be generated on screen. Scan the QR Code from your phone using a QR Code reader. The QR Code will take you to the selected authentication provider to finalize setup. Type in the login verification code on the selected authentication provider app to finish. If you choose at a later time to remove the two factor authentication you will need to uncheck the box and then remove the two factor authentication from EACH user account. To do this, the user must go to "Your Account" (in grey at the top of the green toolbar) and select "Edit Profile." Once the Edit My Profile screen opens, click on Setup Two Factor Authentication. A pop-up window will appear with the option Would you like to REMOVE AUTHENTICATION?" below the Generate Key on the left side of the pop-up. Click on this option to remove from the user account. PLEASE NOTE: At this time, if removing two factor authentication, the two factor authentication option must be unchecked and EACH user account profile updated. See screenshot below.
Ranges
Ranges allows you to set auto-referencing preferences for nearly 100 fields in P2. If auto-referencing is not enabled for a field, users will need to manually enter a reference number for a field. To enable auto-referencing for a field, click on Edit for the selected field. A pop-up window will appear where you can check the "Enable Auto Reference" option. Once done you will be prompted to enter a beginning reference number for the auto-referencing sequence. The next available number will appear in the Next Reference column. The default categories are assigned by Primarius.
Agencies
Next Monitored Lead Time Enter the number of days in between required monitoring visits for agencies.
Allocation Override Multiplier This value will be used to adjust the agency statistic totals used in statistic based allocations. For example, entering a "2" will double the statistics while entering a "0.5" will reduce them by half.
Product Nutrition Field If checked, nutrition fields will be available for use on the prereceipt/receipt level of a product. If unchecked, nutrition values fields will not be available on the prereceipt/receipt and can only be set on the product record.
Agency Memo Enter any default text you would like to see populated on an agency memo.
Default Agency Statement Message Enter the default text you would like to see populated on every agency statement.
Show Grants Available on Statements If checked, all grants available to the specific agency will be displayed on their agency statements.
Show Grants Available on Invoice If checked, all grants available to the specific agency will be displayed on their invoices.
Exclude Zero Balances If checked, any agency with a zero balance for the period will not have a statement generated for them.
Exclude Credit Balances If checked, any agency with a credit balance for the period will not have a statement generated for them.
Email Statement to Agencies If checked, the system will send the agency statement to the "Order Email" contact set on the agency record.
Automatically Generate Agency Statements If checked, the system will automatically schedule agency statements to be generated every month.
Receipts
Receipt Memo Enter the default text/message you would like to appear in the memo portion of ALL Receipts.
Enable Multi Level PO Approval A check mark in this box means that all approval levels less than or equal to the purchase order amount must be approved. The multi level means that if you have an approval level of $1 and an approval level of $500 and an approval for $1000 then one person from each of those levels is required to approve the order. In this example you would have 3 people required to approve the order if it was $1001.00 or greater.
Orders
Number of Invoices 1 is the default but it can be changed. Not many agencies would require multiple invoices.
Load
Invoice Memo Enter the default text/message you would like to appear on all invoices for agency orders.
Keep Order Entry Price This will keep the price that is defaulted from the current receipt or entered manually as the price for that order even though it may be pulling product from a receipt with a different price.
Selection Labels by Storage This will print labels according to the storage type so that all dry will print then all freezer, etc. so you don't need to sort through the labels.
Outbound Pallet
Core Can Order Past Credit Limit If checked, a P2 user in the main system will be able to order past an agencies credit limit while leaving the PWW credit limit restriction in place.
Auto Apply Grants Order Entry A check in this box will automatically apply any eligible grants to all orders. If you do not want to set this default you will have to apply any eligible grants to each order however, if you use this default a grant allocation applied to an order can manually be removed.
Prompt For Order in Process A check in this box will
Display Order Notes Sometimes an agency will put notes on an order, this check box will put it on every order. There is an option when creating an order to put add an order note.
Suppress Auto Email Order on Review When an order is reviewed the system will automatically generate an email to an agency. Check this box to disable that feature. If this feature is checked it will prevent the agency from getting multiple invoices for the same order in case the order is changed and more products are added/deleted from the order after the review process.
Accounting
If your food bank is using dimension accounting you can add the dimensions to the Account for Accounts Payable, Account for AP Discount, and the Account for AP Bank.
Federal EIN This is the food bank's nine-digit federal employer identification number assigned by Internal Revenue Service.
Account Mask In the GL the account mask is the GL account structure IE xxx-xx-xxx-xxxx.
Current Period This is determined by a date range or month.
Fiscal Year Start Date Select the start of the food bank's fiscal year.
Minimum Transaction Close Date Once a date is entered here no receipts or orders can be entered with receipt dates/pickup dates that occur on or before the transaction close date.
Maximum Transaction End Date Once a date is entered here no receipts or orders can be entered with a receipt date/pickup date that is on or after the transaction end date. This field does not auto update so once the date pass orders will not be accepted until a new date is put in.
Post Orders to GL
Post Order Grants to GL
Minimum GL Posting Date
Current Market Value of Food This is the dollar amount per pound determined by Feeding America or your oversight organization. If the value of a product is not set in the product record, P2 will use this default amount to value the product.
Enable Multi Level GL Journal Approval
Post Adjustment by Prod Category If this is checked then when inventory adjustments are made they will post to the GL using the account number associated with the product category instead of posting to the same account number on the adjustment record. For example, when any product is disposed of, the same adjustment reason of "Disposal Spoilage" may be used all of the time. For accounting purposes it may be a requirement to post the disposal of USDA product, Donate and Purchased product to different GL accounts based on the product category.
Max Days for Deposit for Bank Recon
Account for Accounts Payable Select the GL account to be used for accounts payable.
GL Dimension - (2) program
Account for AP Discounts Select the GL account to be used for Accounts Payable discounts.
GL Dimension - (2) program
Account for AP Bank Select the GL account for the bank account being used for accounts payable.
GL Dimension - (2) program
AP Accrual Flag Select True to prevent another user from posting to the GL or performing new transactions before the posting is complete.
AP Check Print Flag Select True for printing AP checks or set to False when a paper check is not needed.
Allow Duplicate AP Checks This would normally be set to False but it can be changed to True.
Enable AP Post Comments Select True to allow comments to post for the transactions or False to disable comments from posting.
Warehouse
This tab is for bar code users only.
Max Case Label When the system is printing case labels it will not print more than the default amount of 999 at a time. This prevents accidentally printing excess labels in error. This default can be changed.
Food Drive Ref When creating a name for a Food Drive the system generates the food drive Reference.
Enable Bar Code When checked along with USE Pick Locations, the bar code functionality is turned on. This is only for bar code users and it must be checked if you use bar coding.
Allow Partial Pallet Transfer When checked you can transfer less than a full pallet when unchecked only the full amount on the pallet can be transferred.
Transform Product Category Warning Check this box to turn on the warning that when transforming the FROM is not the same Category as the TO product. When transforming it is good practice to only transform donated to donated, purchased to purchased, etc. Rarely are there exceptions to this rule.
Enable Pallet Scan on Pick This is for bar code users only. If checked, when using the bar code scanner in the picking process the system will ask the picker to scan the pallet to confirm and/or pick from that Pallet Id.
Never Commit from Bulk After Picked Check to prevent the system from pulling product from a bulk location.
Data Limits
This page is used to set data limits. It ensures that weights/fees/prices are not entered out of the ordinary/keyed incorrectly (such as a unit weight would never be 10,000lbs!) For instance, the food bank may set the max cost for a product at $500 because it knows that it would never buy a product that costs over $500.00.
Max Quantity This is the maximum quantity that can be received in a receipt.
Max Food Bank Inbound Cost This is the maximum cost per unit of measure purchased by the food bank.
Max Donor Inbound Value This is the maximum value per unit of measure.
Max Outbound Price This is the maximum price per unit of measure billed to the agency.
Max Unit Weight Enter the allowed maximum weight of a unit.
Max Received Weight Enter the maximum weight for received products.
Max Service Fee Enter the maximum allowed service fee to be entered.
Max Weight Variance Allowed on Transform Enter the maximum weight variance allowed during a transformation where the weight is not the same amount.
Max Agency Pickup Quantity Enter the maximum quantity of items an agency can pick up.
Agency Pickup Review Day This is the day of the week that the agency pickups are reviewed.
Agency Pickup Last Reviewed This is the date the last review was done for agency pickups.
Require Review for Agency Pickup Check if a review is required for all agency pickups. The review process will look at the required settings for the donor that the agency is using for the pickup and generate a reminder to the contact person assigned to the Agency.
Donors=====Donor Vantage =
THIS IS NOT PART OF P2 AT THIS TIME
.
The system uses a single email account to send all email communications. Each individual user can have an email address associated with their account however, any email sent from Primarius will be sent using the email account entered in the general setup. The individual user's email address can be used as the reply to address on the sent email messages. This allows any replies from the message recipient to be automatically sent to the individual user's address not the email address in the general setup.
Primarius does not actually send emails directly. The email messages are actually handed off to your email server to be sent so that the message comes from a known account using a domain that is recognizable to the recipient. For example, a message comes out of Primarius from 'Food Bank ABC' would be sent from 'admin@foodbankabc.org'.
In order to do this you must enter account/connection information for your email server so that Primarius can properly communicate with your email provider.
Email Address - This is the address all email messages generated in Primarius will be sent from.
SMTP Host - This is your email server's fully qualified domain name for sending email via SMTP (e.g. smtp.office365.com, smtp.google.com, etc.). Check with your email provider for the actual host name.
SMTP Domain - This setting has been deprecated in Primarius. Please leave this field blank in the setup form.
SMTP User Name - This is the username used to log in to the email account entered in as the sending email address in Primarius.
SMTP Password - This is the password used to log in to the email account entered in as the sending email address in Primarius.
SMTP Use SSL - Check this box to use a secure connection when Primarius authenticates with your email server when sending messages. Checking this box also enables connections using TLS.
SMTP Use Default Credentials - This setting has been deprecated in Primarius. Please leave this field unchecked in the setup form.
SMTP Port - This is the port number Primarius will use to connect to your email server when sending messages (e.g. 25, 465, 587, etc.). The port number will vary based on your email provider, secure vs non-secure connections, etc. Please check with your email provider for the actual port number to use when connecting.
SMTP Timeout - This is the maximum number of seconds your email server will wait while Primarius tries to authenticate.
SMTP Target Name - This setting has been deprecated in Primarius. Please leave this field blank in the setup form.
Automation
This page sets the system defaults for managing emails.
Scheduled Messaging Interval - The frequency (in minutes) at which Primarius should attempt to send email messages from the email queue. All email messages generated in Primarius are placed in a queue. Primarius then sends batches of emails, a few at a time, to avoid overwhelming the email server or possibly losing track of messages due to email server communication issues.
Messaging Batch Size - The maximum number of email messages to send at one time.
Scheduled Reporting Interval - The frequency (in minutes) that the system will check and send any scheduled reports.
Scheduled inventory Count Interval - The frequency (in minutes) that the system activates any scheduled physical inventory counts.
There are two programs that typically run during the food banks maintenance window each evening. These can also be run manually by the food bank, although that is typically infrequent. They are:
1) Data Cleanup
a. Removes inventory records with a zero quantity
b. Combines inventory records that match to create one record
c. Resolves weight issues
d. Uncommits inventory that should not have been committed
2) Database Maintenance
a. Reindex tables
b. Removes cached execution plans
Note:
System level activities, such as automated jobs and maintenance routines, are all run using the built-in system user account with the name 'Data Creator'. When a system transaction is executed, any created or modified records will be marked with the 'Data Creator' user as the executing user.
Examples of these types of system transactions are:
- Database maintenance
- Inventory consolidation
- Rebalancing of out of balance transactions
- Scheduled report execution
- Recurring event scheduling
- Automated Meal Connect imports
- etc.
PWW
The setups here are for the agency online ordering system. Most defaults here will be blank. At the top of the page there is an option for Edit the Web Window Homepage Content. This will allow you to create a home page for your PWW. There can be special messages, highlighted products, other website links and any other information the food bank wants to convene to its agencies.
Disable PWW Login This should be set to False to allow agencies to shop online. If it's set to True, PWW login will be disabled and not allow any agency to use the site until this setting is unchecked. (This would normally only be disabled when performing maintenance on the website.)
Order Fulfillment Cut Off Time Enter the cut off time for orders to be placed. Here's an example: If you put 1pm in this field and the agency places an order at 2pm and your setups allow for a 1 day lead time for orders (Order Pickup/Delivery Lead Time field from below), the agency order will be dated for two days ahead because it's already past the 1pm required cutoff time for an order to be processed by the warehouse.
Pickup Time Buffer(in minutes) This works with the scheduling feature. This is the time between pickups/deliveries. For example, you set your agency pickups for 20 minutes, the agency will see the 20 minutes blocks ie. 8am until 820am. The next block will start based on this buffer. If you put a 10 minute buffer the next block of time would be 830 until 850, then 9am until 920am and so on. This can be any number you want.
Statistics Required Check if EVERY agency is required to report its statistics online before placing a new order (monthly or quarterly depending on the Agency Statistics Period).
Disable Statistics Check to prevent an agency from entering statistics.
Force Last Day for Stats Check to set the statistics entered through PWW to be the last day of the month. This ensures that all stats from all agencies have the same Effective Date for any given month.
Agency Statistics Period Select how the statistics are tracked: Weekly, Monthly or Quarterly. You can only select one option.
Maximum Future Days for Stats This is designed to limit the number of days ahead of time that an agency can enter their statistics. The food bank determines the number of days.
Days Between Statistics If statistics are required then enter the maximum number of days between the reporting.
Enable Live Schedule Delivery Check to allow agencies to schedule their own pickup time.
Alternate Agency Pickup Warehouse ID Select an alternate warehouse for online ordering.
Disable Online Orders Check to prevent any online ordering. (This is normally unchecked.) This prevents the agency from changing even pending orders.(This can be used if doing inventory.)
Disable Printing of Shopping List Check to disable the agency from printing the shopping list. (This is normally checked.)
Use Agency Pin Code The agency must acknowledge their order with a pin code before it's sent to the food bank. (The pin code is set up in the agency contacts PWW settings.)
Allow Warehouse Change Check to let the agency determine which warehouse they will place an order from.
Confirm Order on Signing Check to confirm the order after the agency pin is entered. (If you are not requiring an agency pin then do not check this box.)
Stop New PWW orders An agency can still sign into PWW and if they have an order in the shopping cart started it can still be submitted but no new orders can be placed. (This is not normally checked.)
Allow Submit Order This allows the agency to submit an online order. (This box is normally checked.) If unchecked then agencies can fill their cart but cannot submit an order.
Email Mobile Receipt This is used to email a mobile receipt for the online order. (This is normally checked.)
Show Date Log Mobile is for Retail Pickup when they use a smart device (iphone of ipad) when the food bank goes to the donor. If this field is checked then the receipt date will show on the input screen so that the user can edit the date if needed. The intention of using a smart device while they are at the donor’s site is to be able to create a Pre-Receipt right then and there. There was no need for the user to enter the date because it always defaulted to the current date which is assumed to be the date they got the product.
Order Entry Contact Option FOR THE CONTACT info (name, phone #, email address) this is how many contacts can be used for an order, this field is required.
Stop New Orders Before Status Select a status if you want to prevent the agency from placing more than one order or only letting the agency place another order once the previous order reaches a certain status at the food bank. (There is no default for this field.)
Order Entry Life (Hours) Enter the number of hours after entry begins for an online order before the order must be placed otherwise it is automatically cancelled. (0 disables this feature) It is recommended that you give your agencies ample time to come back to their order otherwise orders will be created and sit in the system taking up possible scheduled times for those food banks that use live scheduling and then the system will cancel out the order and the agency has to start all over again. There's no minimum but using something like 10 hours or 24 hours gives your agencies time to get back to the order and finish it without starting over conversely you don't want to give them days and days because it's holding inventory.
Order Pickup/Delivery Lead Time Enter the number of days from the time the agency submits an online order before it can be picked up/delivered. This affects online and food bank processed orders. If you put in a lead time of 5 days then every order created in the system will have a pickup date 5 days from the order entry date. This CAN be overridden on the individual order. This is affected by the Cutoff time in the Order Fulfillment Cutoff time. If you need a 3 day lead time and your cutoff is at noon and the agency places its order at 1pm then it's 3 days from the next day. Today's day wouldn't count since you missed the cutoff time.
Maximum Days for Order Pickup/Delivery Enter the maximum number of days that an online order can be scheduled for pickup.
Agency Order Pickup Cut Off Time This is part of the scheduling resources. Enter the time here that would be the last allowed pickup for scheduling pickup orders. Even if your resource is available until 5pm and you have 4pm used in this block the agency can never schedule an order at 5pm. The system allows for the needed amount of time per pickup so if you have orders being 15 minutes and you put in 4pm for this block the agency will see the last order as 3:45pm.
Volunteer Portal
In development
Application Integrations
To be completed