Payment
Contents
REQUIRED FIELDS FOR AGENCY PAYMENT
Payment Method (created from General Element Setup)
Total Amount
QUICK SETUP:
Process Description:
Payments need to be recorded anytime the food bank receives a monetary transaction (agency payments, donations). When an agency makes a payment it is recorded as received and then the details of the payment are added. For instance, the agency may have 3 outstanding orders with the food bank but the payment received only covers 2 of the outstanding orders. Those orders will be logged against the payment detail. The payments are then posted into a bank deposit through the Deposit feature of Primarius. A payment can be entered on an order if the agency is paying at the time they're shopping at your food bank vs. mailing in a check later which is normally processed under Agency-Payments.
Process:
The main page displays any Open agency payments. There is an option to view the posted and inactive payments as well as to export data and add a new agency payment. Any payments that were taken at the time an order was checked out such as for a cash and carry agency will automatically be populated on the Open agency payments tab.
PROCESSING A PAYMENT AT THE TIME OF THE ORDER (AGENCY PAYS AT TIME OF PICKUP)
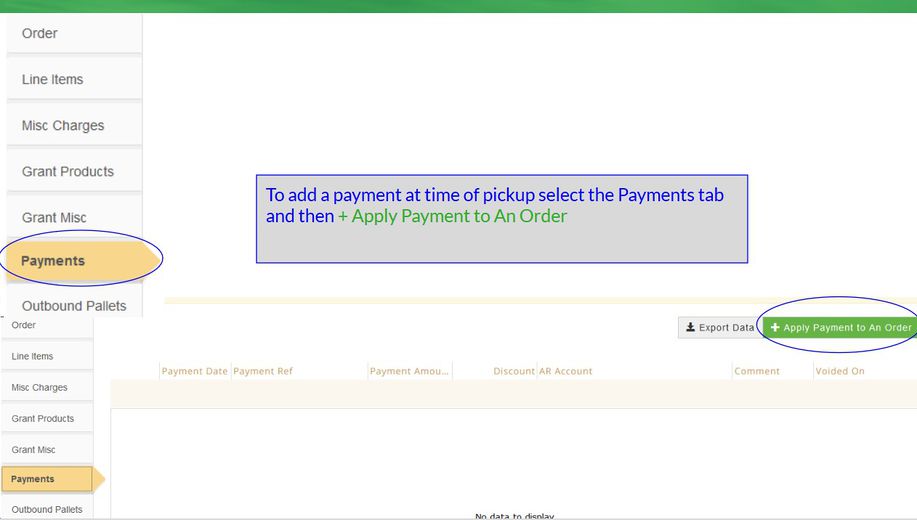
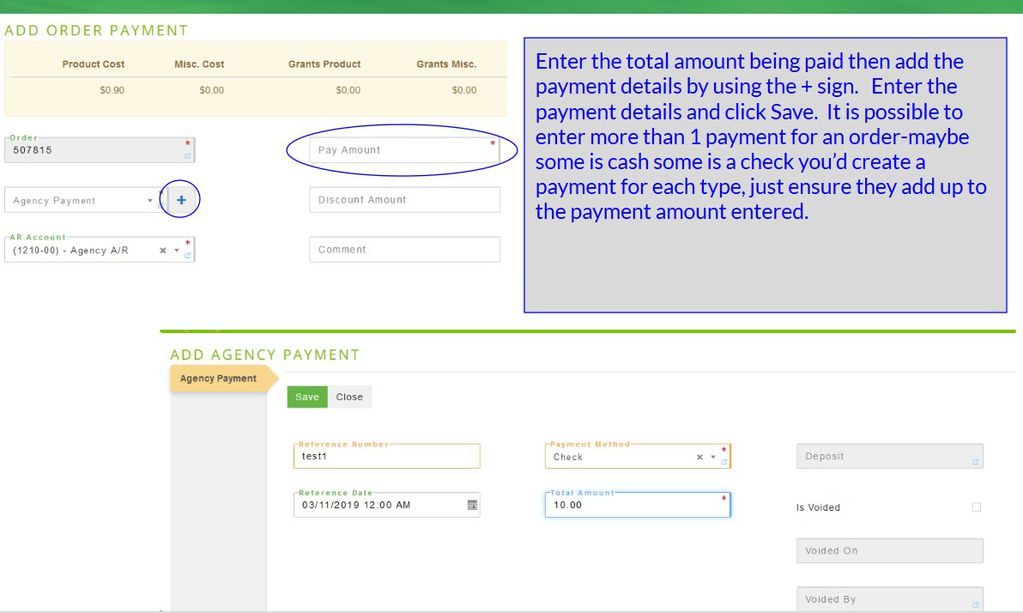
While in the order select the payment tab and click + Apply Payment to an Order. A new page displays, you will need to click on the + sign next to agency payment and enter the payment details (reference #, date, payment method, and total amount for that payment. They could be using multiple forms so if it's part check and part cash you'd create the first payment for the check amount then create another payment for the cash amount) and then click Save and Close when finished. The system will take you back to the Add Order Payment screen.


PROCESSING A PAYMENT RECEIVED (ie. via mail)
There are two options for processing and applying an agency payment, either manually applying the payment to an order(s) or using the Auto Apply feature. (Primarius determines which invoices need to be paid first -oldest to newest).
Click +Add New Agency Payment then select the agency. Complete the fields and click Save.
Payment for a specific order:
Click Save. This payment now appears on the Open agency payment screen.
Auto Apply Payments: (you CANNOT use this if you're using parent/child relationships. If the parent is making the payment for one of the child's orders you need to manually select the order).
Auto Apply (Use Credits) This is used to apply the payments to the orders automatically, any credits are applied to all outstanding orders until used up. A message displays Auto Applied! $xx.xx total to apply to orders. If there was more than one invoice it will tell you how many credit balances may have been fully or partially adjusted to 0. From the Agency Payment tab click Save and the Open Agency Payments tab displays.
Auto Apply (Do NOT use Credits) This applies the payment to any outstanding order. If there is money leftover it is applied to an order with a credit balance that can be used in the future by the agency. A message displays Auto Applied! $xx.xx total to apply to order (order#) with a credit balance of $xx.xx (the remaining balance after applying the payment to the outstanding order(s).
Create Credit Balance Order When a payment is created with this option Primarius creates an order with a credit balance and displays the order number. A message displays Credit Created! Created new order (order#) with a credit balance of $xx.xx No money is applied to any outstanding order balances. The next time the agency places an order the credit information appears in the Order's Notes field and the balance listed at the top of the page will show a negative amount. The order can then be edited and products added.
DEACTIVATE/REACTIVATE
If a payment was entered incorrectly there are two options to correct it. As long as the entry still appears in the Open tab click Edit and make any necessary changes and then click Save.
If the whole entry is incorrect click Deactivate and it will be removed from the Open tab and the system prompts Are you sure you wish to deactivate this payment? Click Cancel to return or Deactivate to continue and a message displays The record was deactivated successfully.
If some detail is incorrect click on Apply to Orders, click Edit for the incorrect line item, the Edit Order Payments opens again and choose Deactivate. The system prompts You are about to navigate away from the current page and any unsaved changes will be lost. Are you sure you wish to leave this page? Click No to return or Deactivate to continue and the system prompts again Are you sure you wish to deactivate this order payment? This is a safety built in so that items are not deactivated in error. To continue click Deactivate. A message displays saying that the record was updated successfully and that line detail will no longer appear under the Apply to Order Line Items tab. Click the Agency Payment tab again. From this page you can Save the changes made. If the payment is deactivated it must first be reactivated and then it can be edited.
To reactivate a payment from the Inactive tab find the payment and click Edit. The payment information page opens, click Reactivate and the system prompts Are you sure you wish to reactivate this payment? Click Cancel to return or Reactivate to continue and a message displays The record was reactivated successfully.
CREDIT BALANCES
If an agency makes an over-payment the system will create a CONFIRMED order with a credit balance to be used in the future. If the agency has a credit balance and you want to apply that to outstanding orders you will do that from the agency profile by selecting the hamburger and then Payment. Click the Auto Balance and the system will find any confirmed orders with a credit balance and apply it to outstanding orders. The Open A/R displays agencies with both debit and credit balances.
BAD DEBTS
There may be times you have to write off an uncollected A/R. This is a 2 step process. First we need to credit the outstanding agency order with a payment. From the Agency menu select Payment, The A/R account should stay the one you use for Account Receivable for agency payments. For the actual payment type you can use whatever payment types you created including one called Bad Debt. You will make the payment for the amount of the write off and then go into Deposits and for the Deposit account select your Bad Debt Expense GL instead of your bank account that you would normally deposit to. Post that deposit.
REMOVING A MISAPPLIED PAYMENT
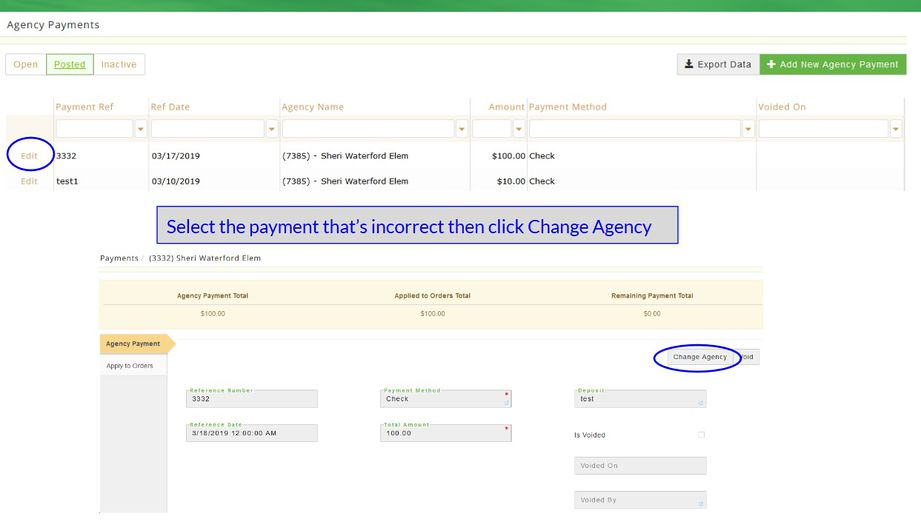
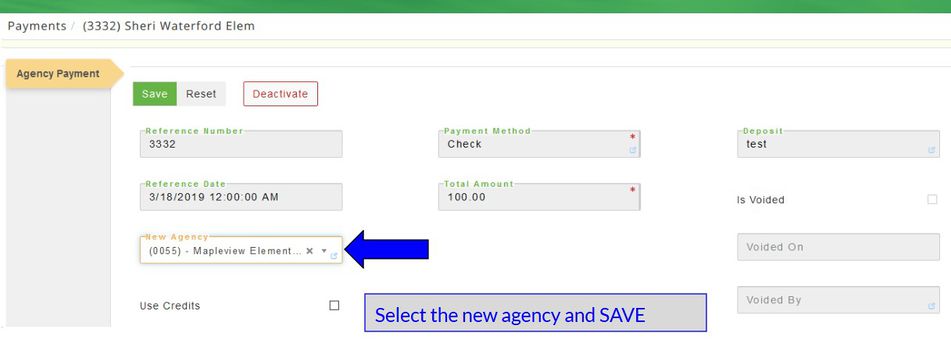
If you gave the wrong agency credit for a payment and posted it, it will need to be reversed. This process is done through the Agency Payments- Posted tab.


The Posted payment tab now displays a negative amount for the incorrect agency and the positive amount for the correct agency. Nothing has to post to the GL since the payment amount was correct. This just fixes the agency balances and any invoices that were originally marked as paid will now show as outstanding.

GIVING AN AGENCY AN INVOICE CREDIT (NOT THE SAME AS A CREDIT MEMO)
Sometimes a situation may arise when you need to give an agency a credit towards an invoice without actually doing a credit memo. Maybe an agency got some bad products and you don't want them to return it to you but you need to reduce what they owe you. Adding a credit is just like doing an agency payment. From the Agency menu select Payments and click +Add New Agency Payment. Select your agency, for the payment method use one that is designated for invoice credits such as partial credit or invoice credit, etc. The payment methods are created in the system element setup. You could use check/cash/credit card but that would get confusing when you're running reports, if you have a designated payment type for credits your agencies will not wonder why it shows they paid by check or cash when they actually didn't. After you complete the first page click Save and then locate the invoice that you are giving a credit on. Complete the fields just like you were doing a payment -the AR should still be the Accounts Receivable GL account #. Then from Agency select Deposit and add a new deposit. The GL Account# for the deposit should be a write off type of GL#. You should only create the deposit for the write off amount because the normal GL # for your agency payment/deposits would be different. If you're not posting to the GL it doesn't matter what GL Account number you use. (Keywords Refund, Partial Refund, Partial Credit, Invoice Adjustment)
VOIDING A CHECK
If you inadvertently gave an agency credit for a payment more than once and you posted the payments you will need to void the duplicate transaction. After you void a payment when you run agency reports you will see a reversal entry in the agency payments/deposits reports as well. Here is the steps to complete the Void process:
Select Agency-then Payments
From the POSTED tab locate the payment to void and click Edit, information about the payment displays. Verify this is the transaction to void and click Void. A message displays the record was updated successfully and a negative amount appears on the Agency Payments Posted tab. When the agency payments report is run you will see the payment and a negative payment to void the transaction. Below are a few screen shots including one from the Agency payment report.
Any fields marked with a * must be completed. Dark grey boxes are view only and cannot be changed.
Definitions:
Agency Payment
Reference Number Enter a reference number/name for the payment.
Reference Date The date the payment will be posted.
Payment Method * Select the payment method. (this is set up by the food bank administrator)
Total Amount * Enter the amount of payment.
Deposit Id This field will remain blank until a deposit is created that includes this payment. Once a deposit is created and this payment has been marked check to include in the deposit this field will populate with the deposit ID created. Or if a deposit was created but not yet posted, the drop-down will display the deposit ID that can be used to include this payment.
overpayment, credit balance, auto balance, payment Add Order Payment
Order * Select the order number.
Agency Payment * Displays the reference number for the payment added in the previous screen.
AR Account * Select the GL account for the accounts receivable payment.
Pay Amount * This populates with the amount of the order invoice, however the amount can be manually changed if the whole invoice is not being covered.
Discount Amount Enter any discount amount if applicable.
Comment Enter additional comments about this payment.
Grant Allocation This will be for future use.