P2 Basics
Contents
P2 Login Screen
Pictured below is the login screen for the main or core program of P2. Once you have successfully submitted the required information, you will be taken to the Dashboard which is the user homepage.
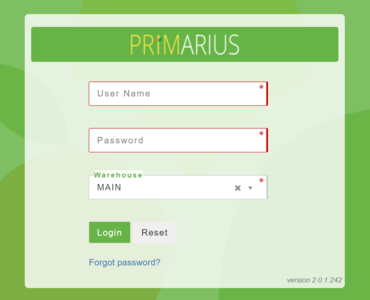
User Name: The user name must be unique from any other user and cannot be the same username for PWW, WMS/Bar Code, or Volunteer.
Password: The user password must contain a capital letter, a number, a special character, no spaces and must be at least 8 characters long.
Warehouse: Select the warehouse from the drop down of options. All processes in P2 will be tied to the warehouse selected from the drop-down.
Login: Once you have entered your user name, password and selected a warehouse, click on the Login button to submit the information.
Reset: Click on the Reset button to erase the user name, password and selected warehouse.
Forgot Password?: Password reset can be enabled under Setup>General Setup>General. If enabled, the link will redirect the user to rest their password. If not enabled, the link will direct the user to a notification that the option is not available and that they should contact their system administrator to have their password reset.
Version #: Provides the reference number for the current software version you will be using once logged in.
Dashboard/User Homepage
The Primarius application takes you to your dashboard, your welcome page. The dashboard is a blank canvas but you can add Widgets that will display anytime you open up Primarius. The widgets that are included now are inventory and agency orders. Any time you're in an application you can open the Primarius menu and click on Primarius to return to your home page. If there are any dashboard widgets created, they'll display on the right side of your screen. You can click any one created and display it.
To create a home page with widgets, click on blue link that says "Click to set up your first dashboard" or the small blue plus sign on the right side of the page. A pop-up window will appear asking you to name the new dashboard you will be setting up. Type in a name and click on Save. You will be taken back to the main page and your chosen dashboard name will appear with a red "x" and 4 green squares to the right of the name as seen in the graphic.
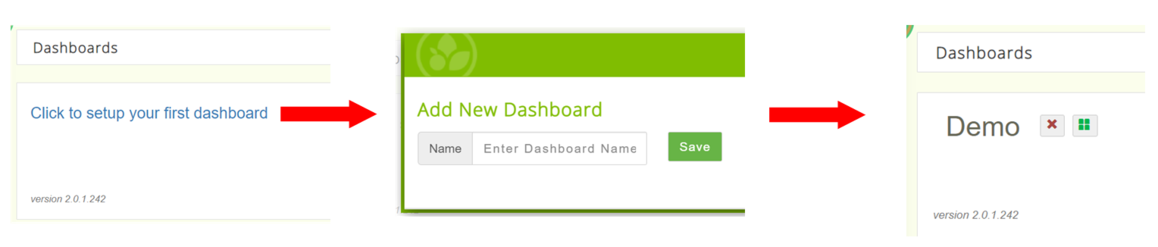
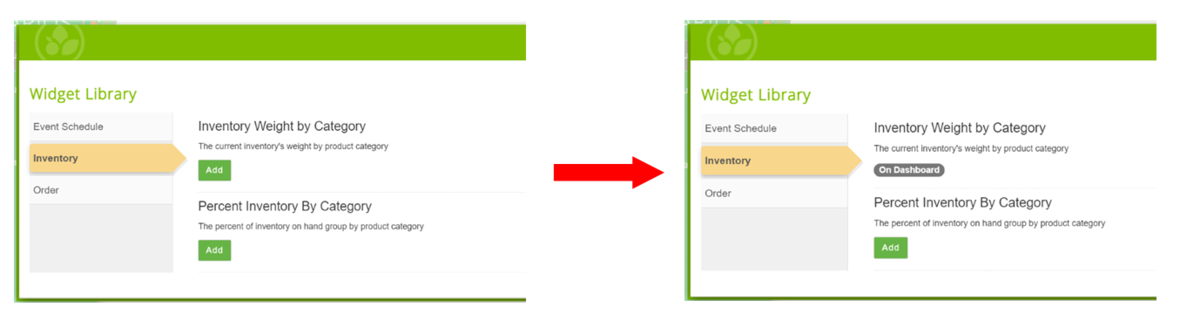
By clicking on the 4 green squares, you will be taken to the Widget Library. As of August 2021, there are three types of available widgets: Event Schedule, Inventory and Order. Select one of the available types on the left side of the screen and then click on ADD under one of the available widget titles. The ADD button will change to On Dashboard. Close the pop-up to return to your Dashboard screen.
Drag the bottom right corner of the widget to increase the size. To remove a widget, click on the widget and drag up. Once you begin to drag, a trash icon will appear. Drag the widget to the trash icon and the widget will be removed.
Navigating the Green Toolbar
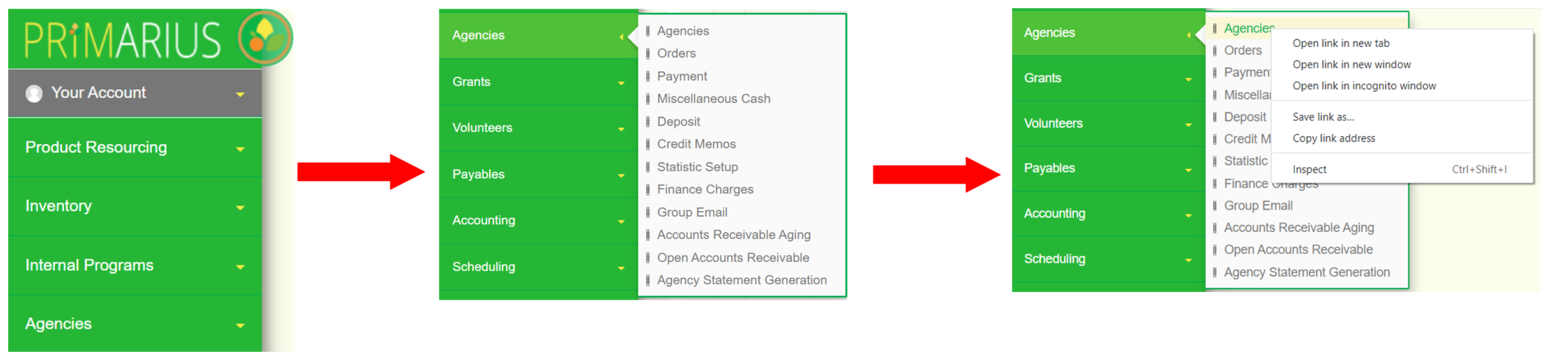
The green toolbar on the left side of the screen is the main navigation tool to access the various sections and pages of P2. The sections are titled in white text on the green background. The sections visible on the green toolbar are determined by your assigned Access Role. If you click on any section, a pop-up will appear immediately to the right of the green toolbar with the available pages under that section. To open a page, click on the page title. HELPFUL TIP: Open the page in a new browser window by right click on the page and selecting "open link in new tab." You can have as many browser widows as you would like opened at one time in your web browser.
Navigating Data Grids
Like any other database, P2 stores information in tables. These tables of information are then presented in a data grid or gridview where fields of information are shown as columns and records or grouped fields are shown as rows. Each data grid in P2 contains different information but they are all designed to function in the same way. This overview is intended to help you understand how to navigate and customize any data grid in P2. For the purpose of this overview, we have provided a screenshot of a demo Products grid below.
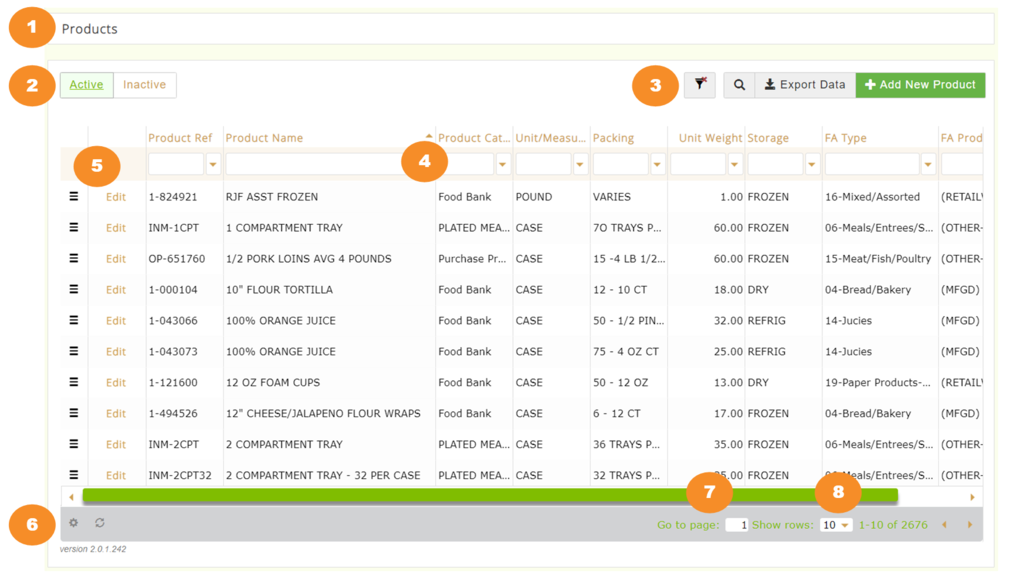
- Grid Name: Type of information contained in the grid.
- Record Types: Different types or groups of records available in the grid. The options available here will vary based on the information being displayed in the grid. However, you will almost always have the option to view Active or Inactive information.
- Actions buttons: The available options will vary based on the data. However, the example above shows the most common buttons you will see: + Add New button: At the top right of each grid there will be a green "+Add New . . . " button allowing you to add a new record or new information to the grid. Export Data: Allows you to export the grid data by current page, page range or all records. When exporting, you have the option to have the information in three formats: comma-separated values (CSV), tab-separated values (TSV) or Excel (xls). Search: Advanced search option for data contained in the grid. Remove Filters: Clears all filters from all columns.
- Column Filters and Sorts: Every column can be sorted A-Z or Z-A or filters can be applied such as "equal", "not equal", "contains", "does not contain", "starts with" or "ends with".
- Hamburger (
 ) and Edit: By clicking on the hamburger icon, you are taken to up to four categories of links to update information. The categories available and their associated links in each category will vary based on the information being displayed in the grid. The Edit button opens the main record to edit or update information.
 - Grid Settings (
 ) and Refresh (
 ): Click on the grid settings to customize which columns are seen in the grid. Remove check marks for any column you do not want to see in the grid or use the reset option to add all columns back into the grid. All customizations in P2 are user-specific, meaning they will only be shown to that user when they log into the system. Grid settings do not change views or options for other users. Click on the refresh icon to refresh grid data.
 - Grid Scroll Bar: Use the scroll bar to move the view left or right to see all of the columns. If your cursor is inside the grid, you can use mouse scroll wheel to move the scroll bar left and right.
- Row Settings and Pages: Use the drop-down to select from 5, 10, 20 or 50 rows to see in the grid. Use the left and right arrows to navigate pages or click into the "Go To Page" box and type a specific page number and hit the Enter key on your keyboard to jump to that page.