Food Boxes
REQUIRED FIELDS FOR FOOD BOXES
Warehouse (created in Inventory - Warehouse)
Transform Warehouse Location (created in Inventory - Warehouse)
Parent Product
Quantity
Process Description:
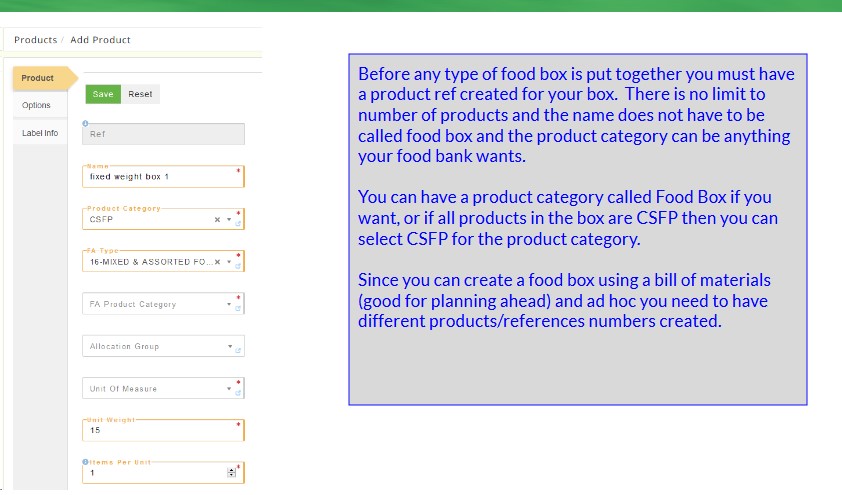
Food Boxes are sets of inventory items that get distributed to agencies in the form of prepackaged boxes that are put together after the individual components are received and put into inventory. This feature is NOT intended for product that is received from the donor in the form of a box or package. For food banks that have cases of items that will be used to include in a food box you can use Product Transform to break those down prior to creating the food box. The Food Box has the ability to do a transform of products such as taking items from bulk and including it in the food box. If you're converting from Classic Primarius it's important to know that you no longer have to have the name to include "food box" and the product category does not have to be food box. When you're creating a food box you still have the parent product (the box) and you tell P2 what the parent product is, that's how it knows to be a food box. If you selected "bottle of water" to be the parent then the boxes will be built using the product reference of bottle of water! Of course you wouldn't actually do that but it explains how the system knows what the parent box is whether it says "box" in the name or not. Now, for ease of searching you could add food box to the name just so you can locate them faster.
There are two types of food boxes: Make from Scratch or make from a Bill of Materials:
Build from Bill of Materials: This is best used for future planning of boxes. For instance, the food bank wants to have a holiday box created and it is to have a meat product, what meat product is going to be included? What if there isn't enough of that product? Is there an alternate product to substitute? This is the same for the other product types to include in the box. The Bill of Materials allow multiple products to be added and assigned priorities. The priorities are helpful in the fact that the food bank is making 100 boxes and wants to include a canned vegetable and there are 30 cans of corn expiring soon, by setting a priority for the corn the workers will use all of the corn first before using another vegetable product. Using the BOM also allows you to transform product, for example you might have 1000 bulk or unsorted food drive cans of vegetables, the food box can have 1 can of vegetables added to each with a product called "Can of Vegetables" or whatever your food bank designates for a unit/each/can and that can be made from your bulk/food drive cans of vegetables.
Build from Scratch This is useful for a quick use. For instance, the food bank has an excess of volunteers that need something to do. A food bank employee can create a food box from scratch list with how many boxes to make and what types of products to put in the box without any regards to specific products. For instance, the food bank received canned donations and separated them into bulk vegetables, meals or fruits, they can have the volunteers build 50 boxes using 50 cans of meals, and 50 vegetables that might be in the bulk sections, etc. You can transform the bulk products into food box items. If you are going to use cases of items then you will need to transform those cases into units in order to include them in the food box build from scratch (you would not usually put a case of water in one food box but you would put a bottle of water in a food box). When you are using the Bill of Materials, the transform is automatically done so it is not necessary to do a product transform from a case to unit.
*** UPDATED** if you're using a mixed product and you don't know how many units are in a case (a case of peppers or case of apples -the quantity can vary) you can set the box to create only 1 then have your warehouse persons create as many boxes as the products allow and then change the quantity of the boxes to what was actually made.
Process:
Before a food box can be made you must have a product ref/name created in your Products (holiday box, summer food box, food box 1, etc.). In Products unlike Classic Primarius it is not necessary to create a product category called Food Box.
The main page displays the In Process Food Boxes, click on Confirmed to view the completed food boxes. There are options to do an advanced search, Export Data and to add a new food box. The six tabs are the steps necessary to complete when creating a food box but not all steps are necessarily completed at the same time. A food box can be created, released and picked but not confirmed on the same day. The Edit feature will allow the user to update the status or it can be updated through the tabs (REPLENISH, RELEASE, PICK, CONFIRM). The numbers in the tab show how many orders are in that particular process. For instance, if there is a number 8 in the Pick tab then there are 8 orders waiting to be picked.
FOOD BOX PROCESSING STEPS
Food Box Tab
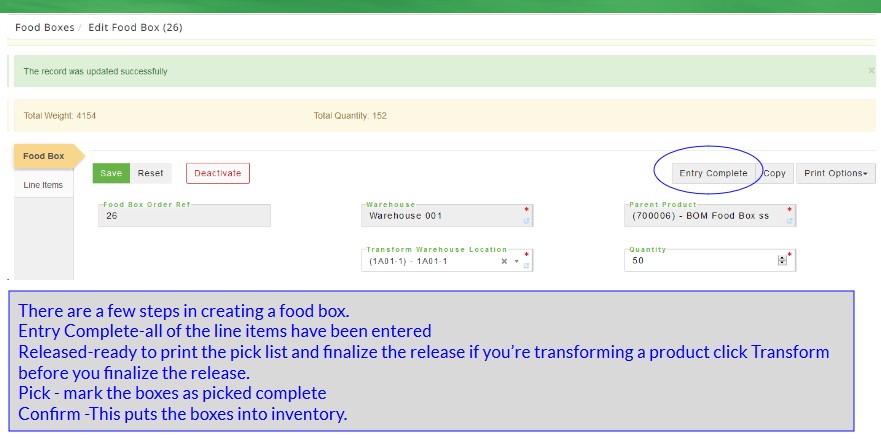
From the Open Food Box tab locate the food box to complete and click Edit.
Click Entry Complete and a message displays The food box is marked as Entry Complete.
Click Release a new screen opens and then the following steps must be completed:
Print Bar Code Labels, Print Pick List , and Finalize Release. The boxes were successfully marked as released. The order is now in the Pick Tab For Bar code users you will pick the food box from Picking-Food Boxes option and once all products are picked complete the food box will be moved to the Confirm tab and can be marked complete when it leaves the warehouse in P2.
Click the Pick Tab and check the box of the order to be picked and click Pick Food Boxes and a message displays The food boxes have been successfully picked, the order is now in the Confirm tab.
Click the Confirm Tab and check the box of the order to be confirmed and click Confirm Food Boxes and a message displays The food boxes confirmed. An agency can now order the food box product.
EDIT/VIEW EXISTING FOOD BOX
Locate the food box and click Edit and a new page opens the food box details opens. Make any necessary changes then click Save when finished.
ADD NEW FOOD BOX
Click +Add New Food Box. There are two options for creating a food box. Select either Build from Scratch where individual products are added to the box or Build from Bill of Materials where the products in the box have already been compiled in the Bill of Materials feature in Primarius. Verify the warehouse information is correct.
When using the Build for Scratch option the items to be included must be selected and added to the box whereas when the Build from Bill of Materials the products are already selected and just the quantity of boxes to make are needed.
FOOD BOX FROM SCRATCH
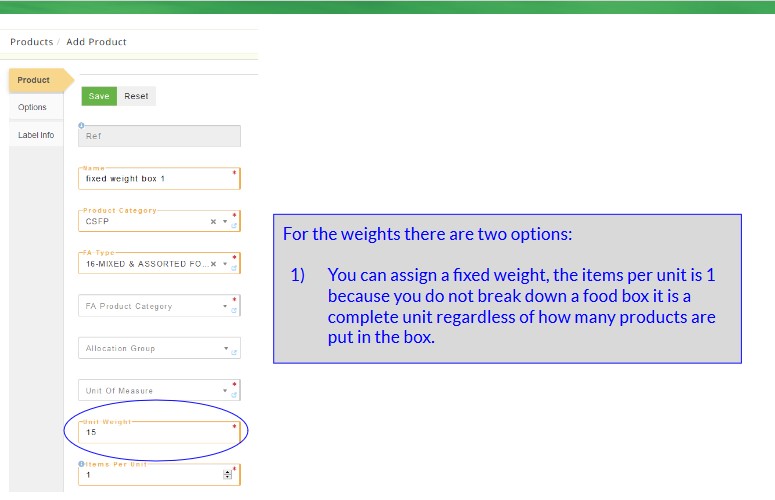
Select Build from Scratch (using a fixed weight product/quantity).

Enter the quantity of boxes to make (if you're not sure of how many you can make because the mixed weight components could have varying quantities then leave this at 0).
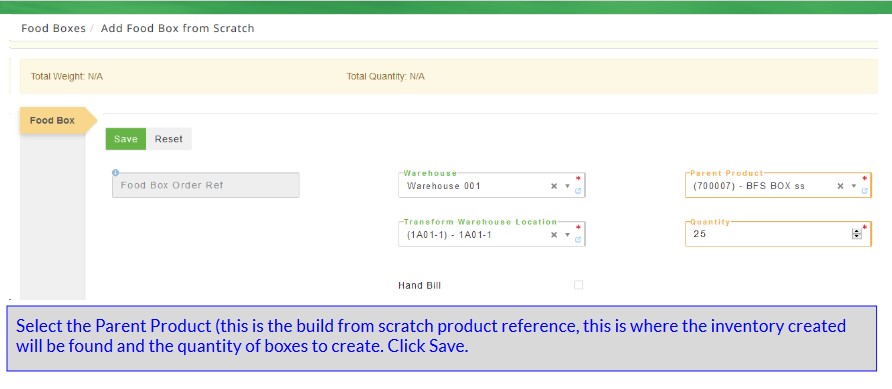
Add the products to include in the box.
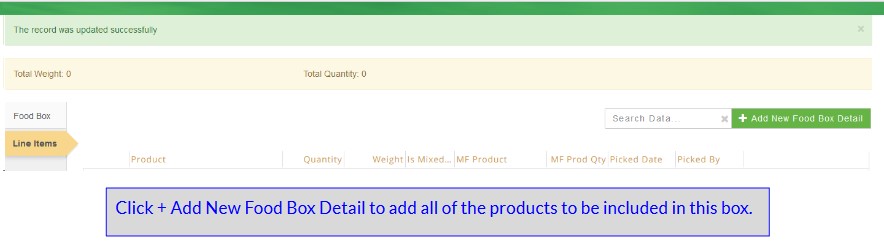
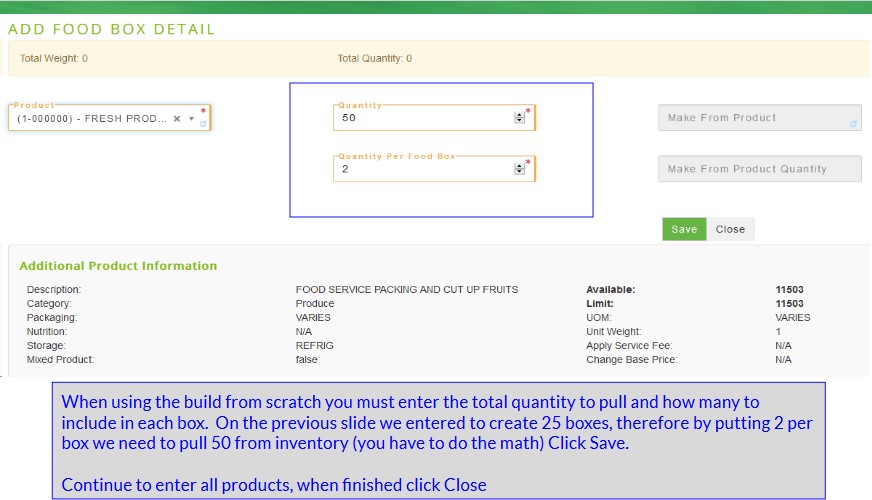
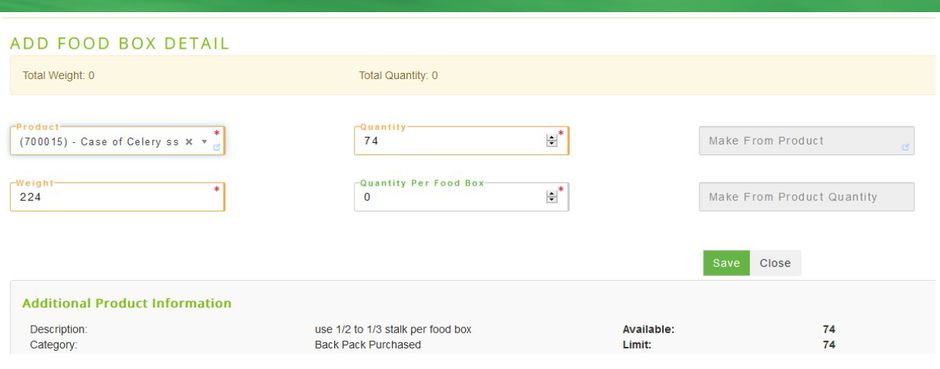
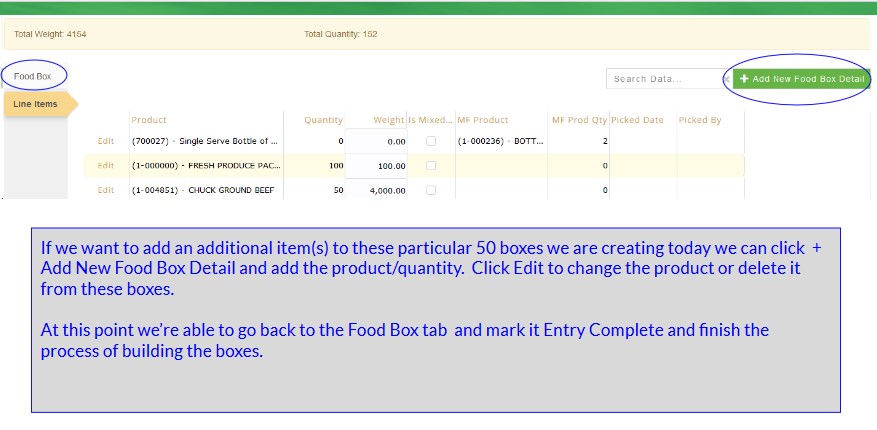
The Add Food Box Detail page opens. Type or select from the drop-down menu the Product being added to the food box, the total Quantity of the product to pull and enter in the Quantity Per Food Box (how many of the product will be in the box). So the total quantity is the # of food boxes multiplied by the number of units per box. For example if 15 boxes need made and there 2 cans of vegetables in each box then the total quantity would be 30, then click Save. Add any additional products. When all items have been entered click Close and the line items page opens listing all products being added to the food box. Click on the Food Box tab, click Save to be able to add more products at a later time or if food box is finished click Entry Complete.
Click Release and there are options to Print Bar Code Labels, Print Pick List and to Finalize Release. Once the Finalize Release is selected a message displays The boxes were successfully marked as released. The order is now moved into the Pick tab.
From the Pick tab select all of the food boxes to pick, then once the boxes have been picked select Confirm-they are now part of the inventory.
BUILD FROM SCRATCH (using products that have mixed weight and unknown quantities).
This works almost exactly the same way. The differences are you'll just enter a "1" for the number of boxes to create (0 is not allowed) and then you'll enter the quantity of cases you're using and you can leave the weights empty until the cases are picked then add the weights of the cases (if you're using all cases then you know the total weight so you can enter the quantity of cases and total weight of those cases which I am doing in the example below).
Select Build from scratch.
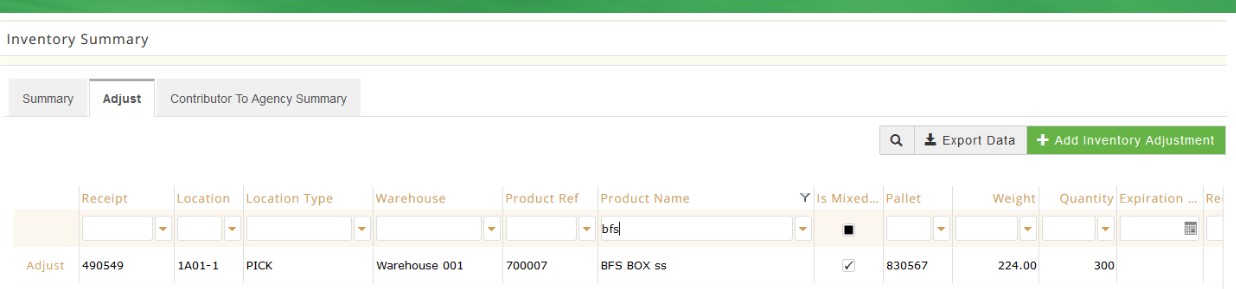
This is a screen shot of tine inventory summary showing you the product I am going to put in my box. This is a mixed weight case of celery.
Select the parent food box (this is going to be the inventory product when the box is complete) so once I create my boxes I will see then as product # 700007. Set the quantity to 1 and click Save.
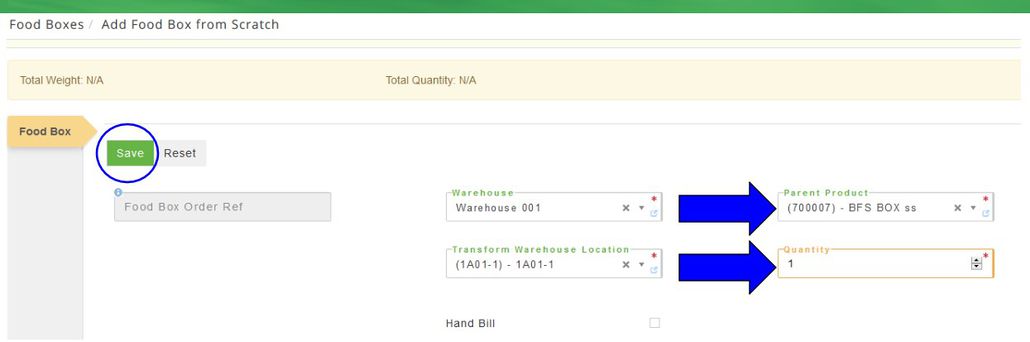
For ease of use I am only going to include the celery in this box. I know from my inventory summary that I have 74 cases of celery that weigh 224 pounds. (if I used less quantity I can leave the weight blank and add it after the warehouse personnel pull the cases).
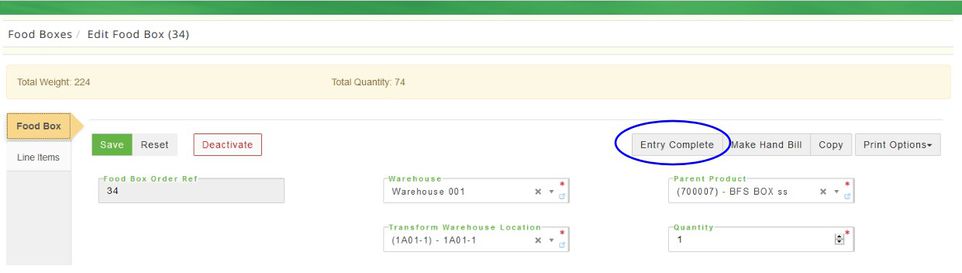
Once all products are entered into the food box I am going to mark it Entry Complete.
The order gets marked Released and then when ready it's put into the pick stage.
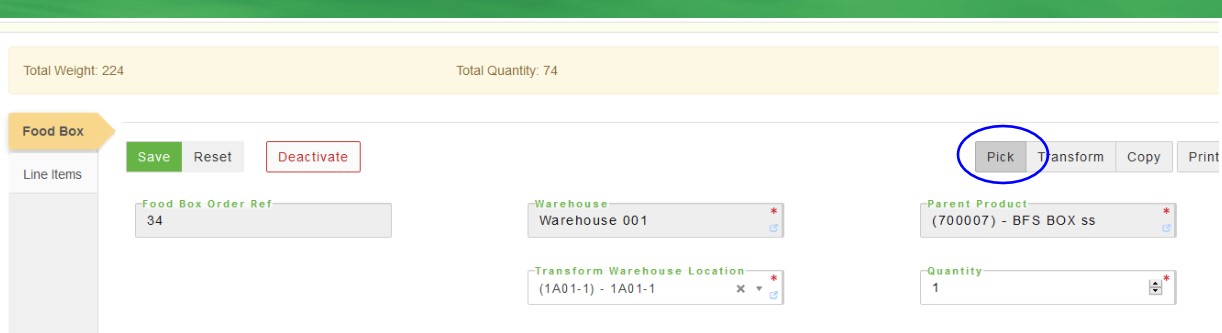
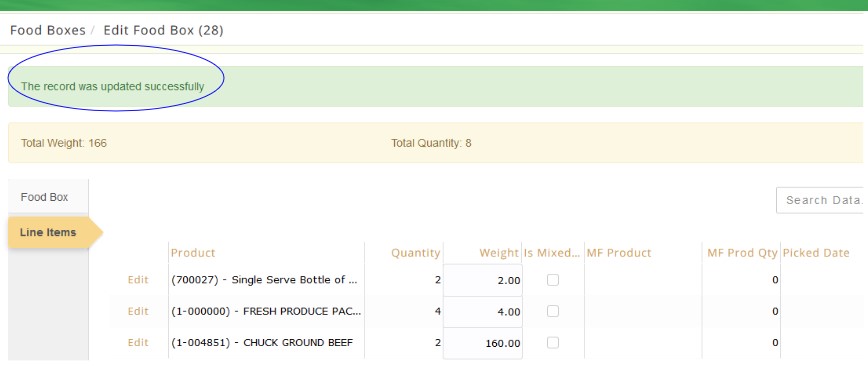
Once the warehouse persons pick the order and create the boxes someone needs to enter the quantity of boxes that were made (and enter the weight of the line items if you left that blank!). Change the quantity from 1 to whatever it should be and click Save. DO NOT CLICK CONFIRM otherwise you will have 1 food box weighing 224 pounds!!!
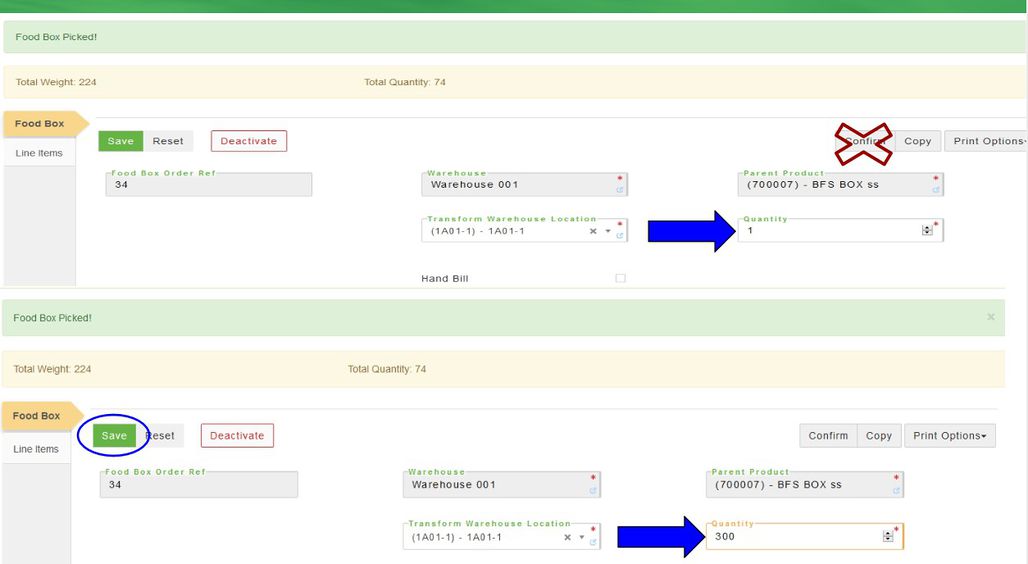
Once you're change the quantity click Confirm, this will put the boxes into inventory.

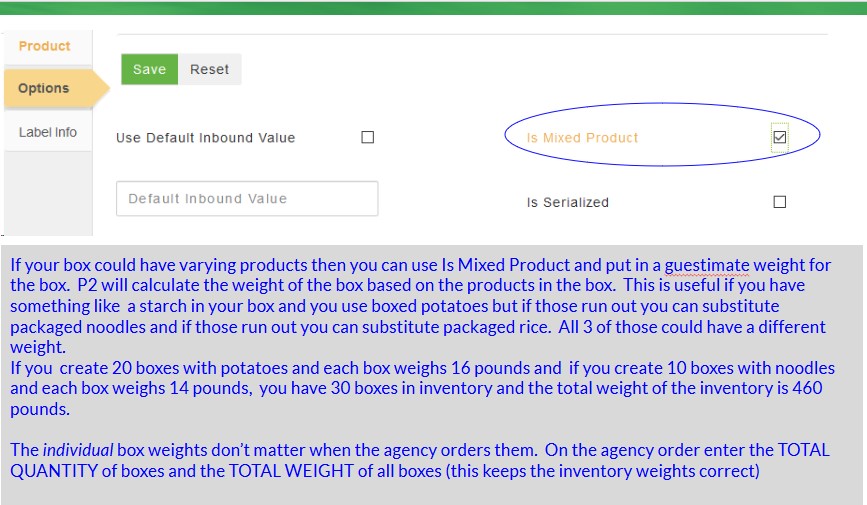
This is the inventory summary: I have 300 boxes available with a total weight of 224 pounds. Remember this is a mixed weight box so when it's ordered by the agency you'll enter the # of boxes and the total weight for those boxes.
FOR BAR CODE USERS
CREATING A HANDBILL FOR BARCODE USERS
You can create the food box shell for the warehouse to finish with the handheld scanner. Select + Add New Food Box and choose build from scratch. Enter the parent product and the quantity of boxes to make and then Save. The line items tab automatically displays, select the Food Box tab instead and click Make Hand Bill and the system prompts Are you sure you wish to make this food box a handbill? Click Make Handbill and a message displays The food box was successfully processed as a handbill.
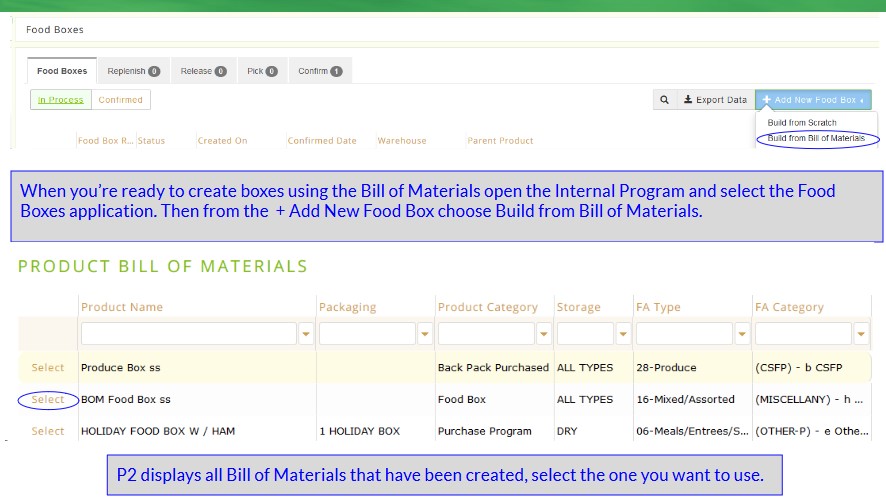
BUILD FROM BILL OF MATERIALS
If there is a food box created using the Bill of Materials feature of Primarius it displays on this page. Select which BOM to use for this food box and a new page opens, enter the quantity of food boxes to make and click Save.
A New page displays the items that are included in the food box. You can add more products if needed or click on the Food Box tab and select Entry Complete. REMEMBER if using a fixed weight box you DO NOT want to add additional products because the weights will be off! This is why it's best to use a mixed weight food box in case you make additions or changes to the products going into the box.
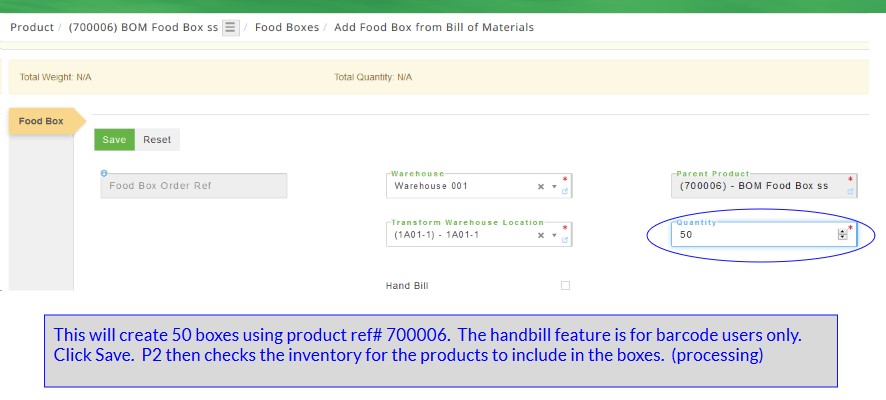
Once you've entered in the quantity to build, click Save and P2 will check the inventory to ensure there's enough products before continuing. If there is a successful message displayed then the line items details tab opens up so you can see what's going into the food box and make any changes/additions.
IF THERE IS NOT ENOUGH OF A PRODUCT FOR A BOM:
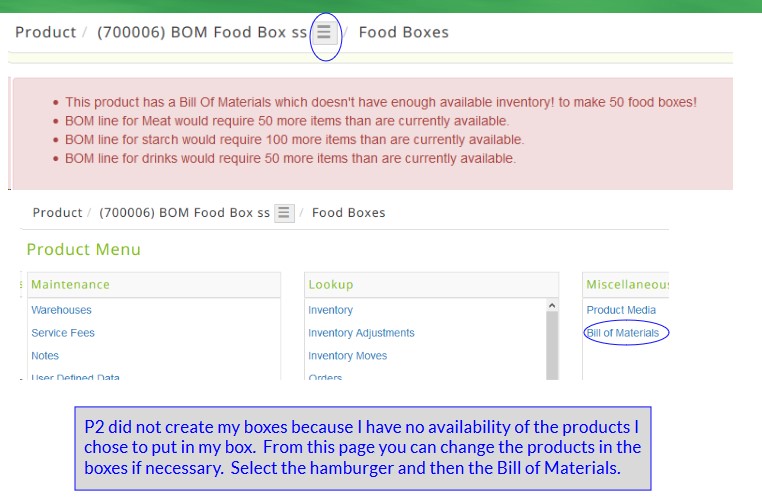
If the user tries to create food boxes from a BOM and there is not enough of a product to create it, a message displays, for example: This product has a Bill Of Materials which doesn't have enough available inventory to make 20 food boxes! BOM line for dessert would require 20 more items than are currently available. This means that a dessert product was included on the BOM but there isn't enough of that product available in inventory to use it. Select the = Hamburger in the dialogue box then click the Miscellaneous tab and choose Bill of Materials. Primarius will open up the Bill of Materials for that particular BOM. This will enable the food bank to select alternate products to include in the BOM if there is not enough of the primary product.
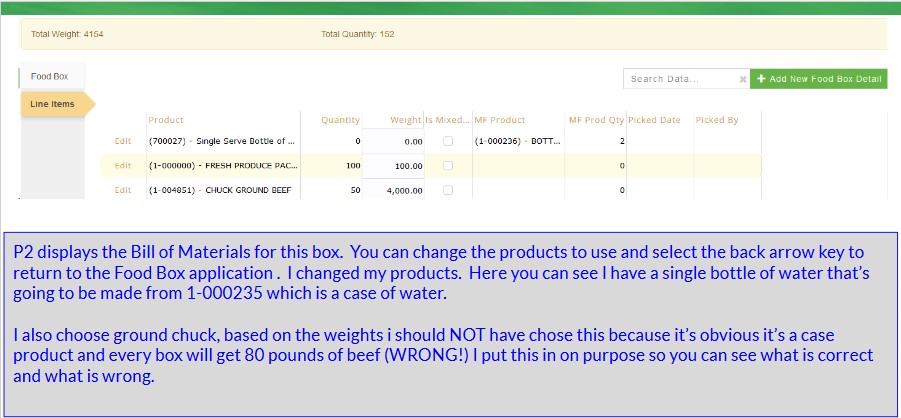
This can be prevented by having multiple items selected when the BOM is first created. Click Edit Product Detail for the product type that has insufficient quantities and the EDIT BOM DETAILS displays, add additional products to choose from. For instance, if canned peas are used for the vegetable, add canned corn and canned green beans, etc. This is where priorities becomes useful, the highest number is 5, meaning a product with a priority 5 will be picked before priority 4,etc. Peas could have a priority of 5, corn 4, green beans 3 signifying to the warehouse to choose peas first, if those run out then use corn, if those run out then use green beans. Or use no priorities, that alerts the warehouse that any of the products listed can be used. After all selections are made click Save.
Once the food box is built there are several steps to complete the food box process. These are done through the tabs at the top of the screen: Food Boxes, Replenish, Release, Pick, and Confirm. It is not necessary that all steps be completed at the same time. At any point in the process click Save to navigate away from the screen. To go back and continue the process from the Open Food Box tab, select the food box and click Edit. FOR BAR CODE USERS Product Transform must be completed in P2 before the food box can be picked in the WMS bar coding software.
DEACTIVATE FOOD BOX/DEACTIVATE ITEMS FROM THE FOOD BOX
To deactivate the entire food box: From the In Process tab find the food box and select Edit. A new page opens, click on Deactivate. A system prompts Are you sure you wish to deactivate this food box? Click Cancel to return to the previous page or click Deactivate to continue and a message displays The food box was deactivated successfully.
To deactivate only a certain product(s) from the food box then from the In Process tab find the food box and select Edit. A new page opens, click the Line Items tab. Locate the product that needs to be deactivated and click Edit. Click on Deactivate and the system prompts You are about to navigate away from the current page and any unsaved changes will be lost. Are you sure you wish to leave this page? Click No to cancel or Yes to continue to deactivate the product. The Deactivate Food Detail page opens and the system prompts again Are you sure you wish to deactivate this food box detail? This is a system check to ensure that the product is not deactivated in error. Click Close to return to the previous page or click Deactivate to continue. Once you click Deactivate the Line Items tab re-displays the remaining items.
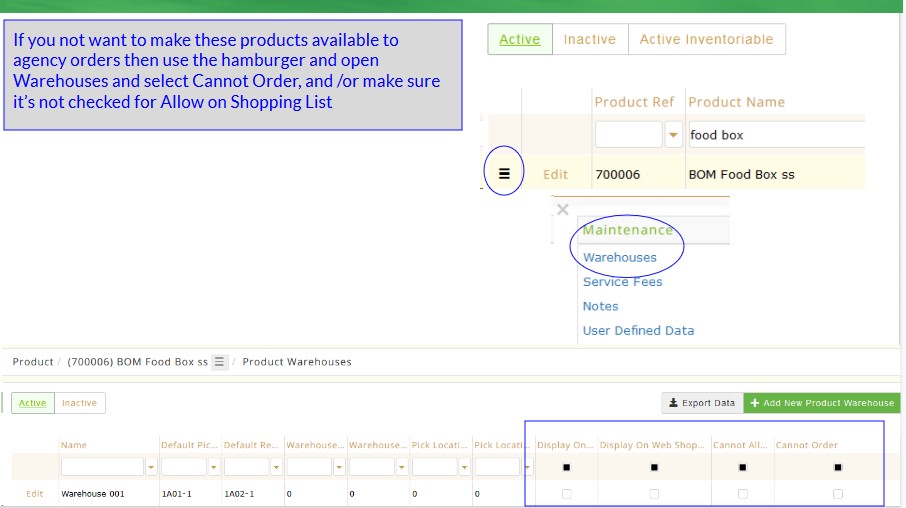
Items marked with a * must be completed. Dark grey boxes are view only and cannot be changed. When a product is selected from the drop-down menu, at the bottom of the page will be
displayed the Additional Product Information. This displays information such as the quantity of product currently in inventory and how the product is packed.
IF you are posting to the GL you would see either of these 2 situations depending if your food bank is using a product category called Food Bank or picking another type of product category such as USDA for the food box.
Scenario 1
So let's say you are including 1 purchased product, 1 USDA product and 1 Donated Product into your food box that is called " Summer Box" (this is an arbitrary name). When you post to the GL you're entry will look like this:
Finished Food Box DR
Work in Progress CR
Work in Progress DR
Purchased Inventory CR
USDA Inventory CR
Local Donated Inventory CR
What we have done is removed the inventory from Purchased/Local Donated/USDA and moved that inventory into our Finished Food Box Inventory. When we look at the inventory adjustments we'll see the adjustments for each product. When we complete the food box process the inventory will now show inventory for our Summer Box and less inventory for the other 3 inventory items.
Scenario 2
So, we are creating a food box our product is called "Winter Box"( again the name is arbitrary) and the product category for this is USDA. When you post to the GL you're entry will look like this:
USDA Inventory DR
Work In Progress CR
Work in Progress DR
USDA Inventory CR
What we have done is removed the individual components out of the USDA inventory and put them into the work in progress, then removed them out of work in progress and moved them back into USDA Inventory. They are back into inventory but the inventory on hand for product reference "Winter Box" has increased and the individual components available inventory has decreased when we completed the Box.
Definitions:
Food Box Order Ref If this field is greyed out it will be system generated otherwise type in a unique identifier for the food box (this is determined by the food bank administrator).
Warehouse Select the warehouse for the product.
Transform Warehouse Location Select the location within the warehouse that the food box will be placed.
Parent Product Select the parent product for the food box (this is the food box product reference that was created).
Quantity Select the quantity of food boxes being created.
Add Food Box Details
Product Select the product to be added to the food box.
Quantity This number is the number of food boxes multiplied by the quantity per food box.
Quantity Per Food Box This is the number of the product to be included in each food box.