Bar Code
==QUICK START:==
Process:
There are two ways to login to the bar code software either scan your badge or click on Use Basic Login and type in your user name and password then select the warehouse you are working and click Submit The main page displays the options for using the Primarius Bar Code software. It is broken down into 5 areas: Receiving, Pallet, Warehouse, Handbill and Inquiry/Print. When you are finished using the bar code software it is important to remember to Sign Out, not just close the box.
Main Menu:
Receiving
There are three receiving options for products at the food bank: Standard receiving of products, receipt of Food Drive products and Retail Pickup receipts. Receiving product is a two layer process. When the product enters the warehouse it is scanned using one of these three options. Once all products have been received and marked complete it will update the quantities on the prereceipt to match what was actually scanned in case there was a discrepancy. For example you expected 100 cases of water but 150 cases were actually received/scanned at the warehouse. When the warehouse marks the order complete it will prompt that there is a discrepancy in the quantity expected/received. If the scan quantities are correct you will mark it complete. The office personnel will then still need to convert the prereceipt into a receipt-marked as received.
1) Standard This is used to receive products from prereceipts. Once a product is received in the warehouse from the scanner, the prereceipt must still be marked as received in P2, otherwise it will remain a prereceipt and the product will not be added to inventory.
When using this process, the prereceipt must be generated in Primarius and the Generate Pallet Labels must be selected from the prereceipt's pallet tab.
RECEIVE PRODUCT
In Process Receiving
Select the prereceipt from the drop-down menu and select Receive Product
In Process Receiving Select the PreReceipt from the drop-down menu There are options to View the Details and to Receive the Product.
Scan Pallet To Receive
Enter the Pallet Label # ( this pallet number is generated from the prereceipt Pallets tab) and click Submit.
Enter Quantity To Receive
Enter the quantity to receive on this particular pallet and click Submit (The Prereceipt, Donor/Vendor Name and the Product information display) A Message displays The pallet was successfully added. Click Close to return.
Confirm Product Received
Once you add a pallet this page displays how many of the pallets, the quantity and the weight that has been received so far, It also displays the details of the Last Pallet Processed. When all pallets have been entered for the receipt click Mark Complete and the system prompts The Edit Pallet is used to change the quantity received on that pallet
VIEW DETAILS
Receiving Detail displays the Donor/Vendor. If the order is Incomplete the Products will be listed and there is an option to Complete the prereceipt.
Receive Product
Scan Pallet to Receive Type/scan the pallet # and click Submit
Enter Quantity to Receive Type in the quantity and click Submit
2) Food Drive This is used to receive products from a food drive.
Scan Pallet to Add to Food Drive Mass Receipt Enter in the Pallet #
3) Retail Pickup This is used to receive mass receipts/products from a retail pickup.
Scan Pallet to Add to Retail Pickup Mass Receipt Enter in the pallet #
Pallet
(This was previously referred to as Warehouse Move on the older Bar Code software)
4) New Location This is used to move the product from one location to another.
Scan Pallet to Move to New Location Type/scan the source pallet and click Submit.
Confirm Pallet xxx Move from Location xxx The page displays the Product Name, Quantity, and Current Location. A message displays Are you sure you want to move pallet xxx from Location xxx? Click cancel to return or Confirm to continue and a message displays Pallet xxxxxx was successfully checked out. Click Close.
Pallet Moves In Progress Select the checked out pallet from the drop-down menu and click Scan New Location
This feature is used if maybe you started to do some moves but didn't finish moving it-this will show any pallet moves that haven't been completed. Also in the main Primarius software, under inventory moves you will see all transfers listed in/out and you can see if you have 3 out transfers and only 1 in transfer that you have 2 incomplete transfers that must be finished with this pallet moves in progress option.
Move Pallet xxxx from Location xxxx to New Location. Type/scan the new location and click Submit
Confirm Move of Pallet xxxxx From Location xxxxx to Location xxxxx. Click Cancel to return or Move to New Location to continue and a confirmation display Pallet xxxxx was successfully moved to Location xxxxx. Click Close.
5) Replenishment Replenishment is used in conjunction with the P2 software. For any orders to show up on this screen, the user in P2 must select the order(s) from the replenishment tab first. Once the orders have been checked for replenish then when you click on Replenishment all orders that have been flagged for replenishment are now part of the replenishment process. Replenishment is done by product store not by an order. Select the type of storage to replenish, such as DRY or REFRIDGERATED , the next screen will display the Location, Product Reference, the Product Name, the Pallet and where it should move to in order to pick the order. Select a Location and complete the steps shown on the screen.
6) Combine Pallets This is used to combine cases from multiple pallets to one pallet ID; the product must be the same for each pallet.
Combine Pallets Type/scan the Source Pallet then click Submit then type/scan the Destination Pallet and the system prompts Are you sure you want to combine pallet xxxx into xxxxx? Click Cancel to return or Combine to continue and a message displays Pallet xxxx was successfully combined into pallet xxxxx. Click Close.
7) On/Off Hold This is used to update the hold status of a pallet.
Update Hold Status. Enter the pallet number and click Submit. A new page opens and the system prompts Would you like to add a hold to this pallet? Click Cancel to return or Add Hold to continue and a message displays The hold status for pallet xxxxx has been updated successfully. Click Close. To remove a hold from a pallet enter the pallet number and a message displays Would you like to remove the hold from this pallet? Click Cancel to return or Remove Hold to continue and a message displays The hold status for pallet xxxxx has been updated successfully. Click Close
Warehouse
(This was previously referred to as Warehouse Other on the older Bar Code software) There are two options to choose from:
9) Adjustment This is used for adjusting the product on a pallet.
Adjust Product on Pallet Type/Scan the pallet ID and click Submit The page displays the Pallet #, Product on the pallet and the Quantity. Type in the new quantity, select the adjustment reason and any comments then click Submit
Confirm Adjustment This page displays the pallet ID, product, the old and new quantity and weight. If correct click Submit and a message displays The pallet was successfully adjusted. Click Close and continue to scan any other pallets to adjust or click Main Menu.
a) Count Entry This will display any active counts for the selected warehouse.
Active Inventory Counts Select the count to use and click Submit
Scan Pallet To Count Enter the pallet ID and click Submit
Enter Counted Quantity This page displays the Pallet, Location (with an option to Move Pallet), Product. Enter the Quantity and click Submit
Confirm Count This page displays the pallet and location and the quantity entered with the total weight. Click Submit and a message displays The Pallet Count was successfully saved. Click Close and continue to scan more pallet or click Main Menu.
Handbill
If you create a new handbill it must still be confirmed in P2, it will appear in Warehouse Transfer under the Confirm tab.
b) Order Either enter the order number or click on New Handbill Order and type in the Agency Reference number and click Submit
If using the order #
Scan Pallet to Add to Order The Agency information displays, type/scan the pallet and click Submit
Enter Quantity from Pallet xxx for Order xxx Type in the quantity of product, the page displays the order #, Agency and the Product information. Click Submit and a message displays Pallet xxx was successfully added to Order xxxxx. Click Close and either add more pallets to the order or click on Main Menu.
If using the agency#
Enter Agency for Creating Handbill Type in the agency reference and click Submit
Confirm Agency for Creating Handbill The name of the agency will populate as well as the Agency Ref. If the correct agency is displayed click Add A New Handbill Order.
Scan Pallet to Add Order Enter the Pallet # and click Submit
Enter Quantity from Pallet xxx for Order xxxxx and Click Submit The page displays the Agency information and the product name and reference that is on that pallet.
For this feature to work the order must have been created with a handbill or it must be picked complete. If the order is picked complete, type in the order # and a new page opens the Order number and the Agency; enter the pallet to assign for this order and click Submit Enter the quantity from the pallet for the order and click Submit and a message displays Pallet xxx was successfully added to Order xxxx. Click close and either add more pallets to the order or click on Main Menu.
c) Transfer This is used to move pallets from one warehouse to another warehouse
Scan Transfer for Handbill There are two options: either type in the Transfer number or click New Handbill and type in the Warehouse Reference number and click Submit Click on Reset to clear out all entries.
d) Food Box Enter Parent Product for Creating Handbill and click Submit
Confirm Parent Product for Creating Food Box Handbill Enter the quantity to create and click Add a New Handbill Food Box (quantity must be greater then 1)
Scan Pallet To Add to Food Box Enter in the pallet that the food box and click Submit
Enter Quantity from Pallet xxxx for Food Box xx Enter in the quantity of product that is being used and the quantity of that product that will be in each food box. The page displays the parent product for the food box and the product that is being included in the food box being created and click Submit. A message displays Pallet xxx was successfully added to Food Box xx. Click Close to return.
Outbound Pallet
There are five options to choose from: When picking an order that uses outbound pallets, the order will force you to choose which outbound pallet is being assigned for the order.
e) Move
Scan Pallet to Move to New Location Type/Scan the pallet and click Submit This is for the outbound pallet ID not the product storage pallet ID
Confirm Pallet xxxxxx Move From Location xxxxxx, The page displays the Product Name, Quantity and Current Location A message displays Are you sure you want to move pallet xxxxx from Location xxxx? Click Cancel to return or Confirm to continue. The system displays Pallet xxxxx was successfully check out. Click Close and new page opens
Pallet Moves In Process Select the checked out pallet from the drop-down menu to assign it to a new location and click Scan New Location.
Move Pallet xxxxx From Location xxxx to New Location. Type/ scan the new location and click Submit
Confirm Move of Pallet xxxxx From Location xxxx to Location xxxx. Are you sure you want to move pallet xxxx from Location xxx to Location xxxx? Click Cancel to return or Move To New Location to continue. The system will display Pallet xxx was successfully move to Location xxxx. Close
f) Adjust Enter in the outbound pallet # and the system displays what is on the outbound pallet- Agency, order#, p/u date, tare weight and height. At the bottom is the product pallet and quantity/weight that is on the outbound pallet, select a pallet that needs adjusted and enter the new quantity and Submit.
g) Pallet to Pallet This is used when creating an order that maybe you have multiple pallets on, while loading the truck that order you realize that one pallet might be too heavy and you want to move some of the product off of that pallet and put it on another pallet for that SAME order. ie. you have a pallet of potatoes and it weighs 300bls but the max weight needs to be 200lbs and your other pallet has corn that weighs only 50lbs so you can move 100lbs of potatoes from one pallet and put it onto the corn pallet since both are from the same order and going to the same agency.
h) Truck Load Enter the outbound pallet ID and select submit. On the new page you must enter the Delivery Vehicle name (the suggested name displays) and hit submit. Before you do this, the outbound pallets must be slotted onto the truck (in P2 core-Delivery Vehicle Load)
Inquiry/Print
There are four options to choose from:
i) Pallet
Pallet-Scan Scan/Type in the pallet number then click Submit
Pallet Details This page displays the Pallet#, Product details, and Inventory Information. The inventory displays: Receipt #; Received Date; Donor; Product; Quantity received; Total Weight and if the product is committed, the order# displays. There are options to Scan Another Pallet or to Print the Pallet Label. There are options to Scan Another Pallet or to Print the Label.
j) Location
Location-Scan Scan/Type the location to view/print then click Submit and a new page opens the details about that location.
Warehouse Location Ref This page displays the Warehouse Location and Name, the Location Type and any comments, if the Location is on hold a message displays Is On Hold. There are options to Scan Another Location or to Print a Label.
k) Product
Product Details-Scan Reference Type in the product Ref or click on Scan Product UPC/PLU. A new page opens the product details, at the bottom of the page there are options to scan another product reference, scan a product UPC/PLU, change the default pick location or Print Labels. If you select Change Default Pick Location a new page opens.
Change Default Pick Location This page displays the Product, select the new pick location from the Active Pick Locations drop-down and click Submit
Confirm Pick Location Change This page displays the Product and the new pick location. Click Cancel to return or Save and a message displays The default pick location was updated successfully. Click Close
l) Mixed Product There are two options to view mixed products.
Product Detail-Scan Reference or Product Detail -Scan UPC/PLU Type/scan the Product Ref or the UPC/PLU and click Submit and the product details displays. At the bottom of the page there are options to Scan Product Ref, Scan Product UPC/PLU. Change the Default Pick Location and to Print Labels. If you select Change Default Pick Location a new page will open
Change Default Pick Location This page displays the Product, select the new pick location from the Active Pick Locations drop-down and click Submit
Confirm Pick Location Change This page displays the Product and the new pick location. Click Cancel to return or Save to continue and a message displays The default pick location was updated successfully. Click Close
Picking:
Picking is used for Orders, Food Boxes and Transfers. They are listed separately. In P2 these appear under the Picking tab. If you are picking an order that is using outbound pallets you will be prompted to select which outbound pallet you're going to put the products on. Then you will continue the picking process.
In Process Picking
Picking Type = select what is being picked: Orders, Food Boxes or Transfers Count displays the number of orders that need picked
1)Scan Order for Picking Select/Scan the Order # that is being picked.
2) Choose Product Storage for Order Picking This page displays the Order #, the Agency name and the expected pick up date/time. You must select the product storage for this order and then click Submit. Remember there may be more then one type of product storage listed, if so that means that you have products on this order coming from more then one storage area, it is designed to show you all products in one area at a time for ease of picking purposes, then click Submit. (There is an option to scan a different order if you selected the wrong order) For instance if you have and select Dry all items on the order that are stored in the Dry area display. Once you've selected all of the product and return to the Choose Product Storage for Order Picking and have/select Refridgerated on the drop down all products that need picked from that area display.
3a) If using outbound pallets select the Outbound Pallet # and then enter the Tare Weight and Height then continue to 3b.
3b) (non barcode) Choose Location for Order Picking This page displays the Order #, Agency name, Pickup date/time and the Product Storage. It also displays the location and the quantity to be picked with the product ref# and product name. Click on a Location to pick that item.
Scan Location for Order Picking This page displays the Go To Location, Product, and Product Name. Scan Location this location must match what is in the Go To Location, if you type in the wrong information the system displays Incorrect location! Should be xxxx that it doesn't match-it will not accept incorrect information. This is a system verification that the product is being picked from the correct location.
Scan Pallet for Order Picking This page displays the Go To Location, Product Ref, and Product name. You are required to scan the pallet ID, this pallet ID must be the same one that displays under Pallets At This Location, then click Submit. If you can the incorrect pallet a message displays XXXXX is not a valid pallet for this product for this location!
Enter Quantity /Weight from Location #### for Order #### You must type in the quantity of product being pulled for this order-it should match the displayed quantity on this page, if the product is mixed you must enter the weight as well, if this field is empty it must be completed and it must match the weight displayed in the greyed out box, then click Submit. A message displays Pick Complete for Product (product name) for Order #### Click Close. Continue to pick the remaining items on the order. If the pallet does not have enough product a message displays There is only x here! You have the option to enter the quantity available on that pallet and short the order or continue picking from another pallet after you select the max quantity available on this pallet.
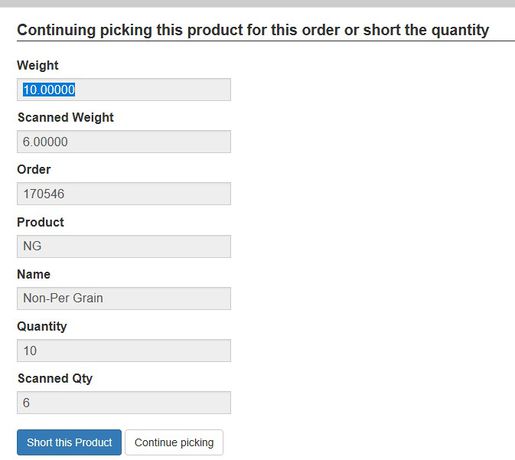
If you enter a different quantity-for example you scanned 2 cases but you were to scan 3 a message displays Continuing picking this product for this order or short the quantity. There is an option at the bottom of the page to either select Short this Product or Continue picking. If you select continue picking it will go back through the flow process and you will have the same location displayed, however when you go to enter the quantity to pick you only need to enter the amount it was short-in our example we were supposed to pick 3, we entered 2 so the screen will display Quantity 3, Scanned Qty 2 so for the Qty at the top of the page you would enter 1, then click Submit. If you shorted the product for whatever reason the P2 will automatically update the the quantities scanned. You can never scan more then the requested amount.
If there are more products to pick the Choose Location for Order Picking Screen displays. After all the the items have been picked on the order it displays Choose Location For Order Picking and you can scan another order or scan a different product storage for this order (maybe some products are dry and some are refrigerated so you would of course pick all dry before picking all refridgerated, etc.) Click on Main Menu when complete. The order status in Primarius is now set to Picked and ready to be marked confirmed when the agency either picks it up or it ships out of the warehouse. If the order is not in the picked status then something may have been missed in the bar code software. Pull up the order again in the bar coding software and select the other storage type(s) and verify no items display. For instance the warehouse worker might have only picked all Dry product but forgot about the Frozen products the order will not set to picked until ALL items are picked.