Access Roles
Required Fields For Access Roles
Name Specific name assigned to each Access Role.
Description A brief description of what permissions are provided with that specific role.
Overview:
Access roles define what a user can and cannot do in P2. In other words, Access Roles determine a users permissions in P2. Any user can have one or more access role. Access Roles can be changed at any time by any user with permssions. For instance, if your administrator is going on vacation they may assign the admin role to another employee. As a best practice: We suggest making a list of all employees who will be using P2 and what parts and process in P2 where they will need access. Permissions are based on the ability to edit and view. For example, a truck driver/warehouse person may not need to edit details on Agencies however, they may need to View details such as addresses. P2 has 4 default access roles built in as examples. You can use these existing rols OR create your own customized Access Roles. You can create as many access roles are you want, HOWEVER Access Roles cannot be deactivated or deleted. When creating new Access Roles, be careful not to create similiar or confusion Access Roels that may cause issues in the future when they are assigned to users.
Access Roles grid:
The main page displays all current P2 Access Roles in a grid. At the top of the grid there are five tabs that group the Access Roles: 1) Primarius (for P2 core users), 2) Web Window (for agency contact users), 3) Warehouse Management (for bar code users), 4) Volunteer (for Volunteer users) and 5) All Roles (showing all for categories in one grid). On the upper right side of the grid you will see options to clear any grid filters, Export Data and + Add New Access Role. Filters can be set on any column or multiple columns just like all other grids in P2. Columns can also be moved by clicking and holding, click on a column and then drag the column to a new location.
EDIT (to change or view the access role)
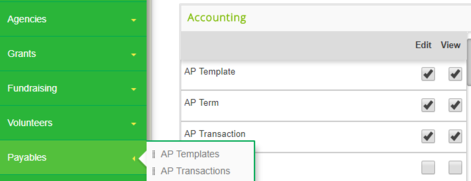
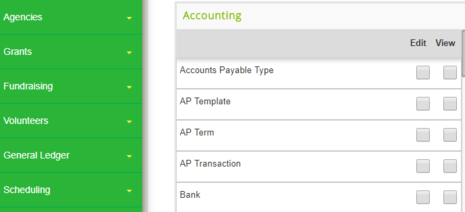
Locate the role on the grid, click Edit and a new page opens showing two tabs; General and Role Details. The General tab will open showing the Name and Description for the selected Access Role. Click on the Role Details tab to see the specific permissions assigned to this role. Use the Search Role Details to find specific permissions or specific sections of P2 to add or edit permissions. The Role Details are broken down into different tables such as Accounting, Agency, Clinet Services, Contributor, etc. Each table will show a field or section name along with two columns of checkboxes: 1) Edit and 2) View. A checkmark in either box designates that the specific item is turned on. For example, if you would like permission to view and edit an agency record go to Agency and place a checkmark in the box under the Edit column and a checkmark in the box under the View column. By clicking on the Edit box, a checkmark will automatically be placed in View checkbox. The checkmarks determine what this role is authorized to do or what permission they have on that item. All of the P2 functions are listed under the various tables.
+ ADD NEW ACCESS ROLE
Creating an access role is a 2 step process.
Step 1: Create the general Role. Click +Add New Access Role and choose a name and description and click Save the type of access role to create. A new page opens, complete the general fields and click Save.
Step 2: Once you create the general access role you'll need to assign the role details. Click on the Role Details tab. A new page displays all possible role details this access role can have. You'll need to check which ones to apply. These can always be added/deleted at any time. EDIT and VIEW are different and if you have Edit access it doesn't guarantee you have View access. So you would need to make sure to check both the Edit and View for some users to do both.
Below are two screen shots one with the access role for AP and one without the AP permission. The Primarius Menu no longer displays the Payables Menu since all Edit/Views were taken away from the AP options.

